// BT Throttle for DSair2 //
// 2022-09-23 HMX@Tetsuo-san Returns //
// public-domain software //
#include <RotaryEncoder.h>
#include <SPI.h>
#include <Wire.h>
#include <Adafruit_GFX.h>
#include <Adafruit_SSD1306.h>
#include <Adafruit_NeoPixel.h>
#include <BleKeyboard.h>
BleKeyboard bleKeyboard;
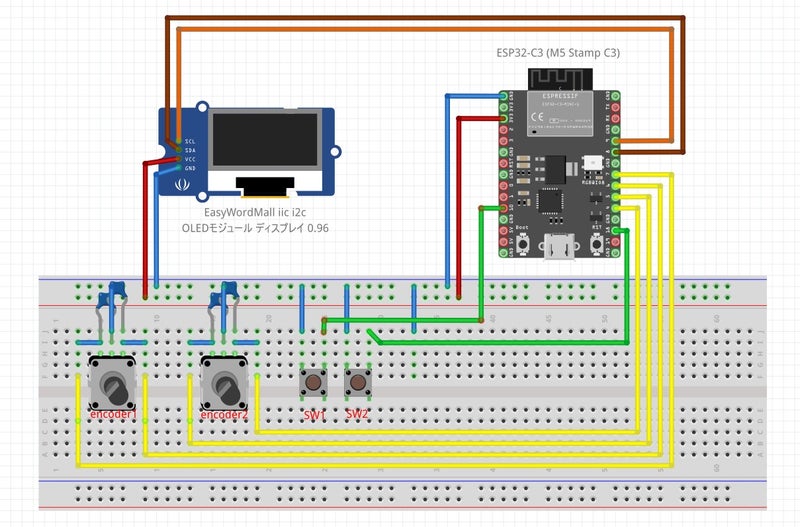
#define LED_PIN 2
#define Enc_1A_PIN 4
#define Enc_1B_PIN 5
#define Enc_2A_PIN 6
#define Enc_2B_PIN 7
#define SW_1_PIN 10
#define SW_2_PIN 18
#define SCREEN_WIDTH 128 // OLED display width, in pixels
#define SCREEN_HEIGHT 64 // OLED display height, in pixels
#define OLED_RESET -1 // Reset pin # (or -1 if sharing Arduino reset pin)
#define SCREEN_ADDRESS 0x3C ///< See datasheet for Address; 0x3D for 128x64, 0x3C for 128x32
// create a pixel strand with 1 pixel on PIN_NEOPIXEL
Adafruit_NeoPixel pixels(1, LED_PIN);
// Encoder //
RotaryEncoder* encoder1 = nullptr;
RotaryEncoder* encoder2 = nullptr;
IRAM_ATTR void checkPosition() {
encoder1->tick(); // just call tick() to check the state.
encoder2->tick();
}
// OLED Display //
Adafruit_SSD1306 display(SCREEN_WIDTH, SCREEN_HEIGHT, &Wire, OLED_RESET);
// 変数 LOCO //
int Cmd_MaxNum = 32;
char* Cmd_Caption[] = {"Power","STOP","FWD/REV"
,"F0","F1","F2","F3","F4","F5","F6","F7","F8","F9"
,"F10","F11","F12","F13","F14","F15","F16","F17","F18","F19"
,"F20","F21","F22","F23","F24","F25","F26","F27","F28"};
int Cmd_Tab[] = { 15, 20, 5
, 32, 32, 32, 32, 32, 32, 32, 32, 32, 32
, 28, 28, 28, 28, 28, 28, 28, 28, 28, 28
, 28, 28, 28, 28, 28, 28, 28, 28, 28};
void setup() {
// Serial //
Serial.begin(115200);
// pixel //
pixels.begin(); // initialize the pixel
// OLED Display //
if(!display.begin(SSD1306_SWITCHCAPVCC, SCREEN_ADDRESS)) {
pixels.setPixelColor(0, pixels.Color(126,0,0));
pixels.show();
for(;;); // Don't proceed, loop forever
} else {
pixels.setPixelColor(0, pixels.Color(0,15,0));
pixels.show();
}
display.clearDisplay();
display.display();
delay(100);
// Encoder // 必ずOLEDより後に入れる。
encoder1 = new RotaryEncoder(Enc_1A_PIN, Enc_1B_PIN, RotaryEncoder::LatchMode::TWO03);
attachInterrupt(digitalPinToInterrupt(Enc_1A_PIN), checkPosition, CHANGE);
attachInterrupt(digitalPinToInterrupt(Enc_1B_PIN), checkPosition, CHANGE);
encoder2 = new RotaryEncoder(Enc_2A_PIN, Enc_2B_PIN, RotaryEncoder::LatchMode::TWO03);
attachInterrupt(digitalPinToInterrupt(Enc_2A_PIN), checkPosition, CHANGE);
attachInterrupt(digitalPinToInterrupt(Enc_2B_PIN), checkPosition, CHANGE);
// Switch //
pinMode( SW_1_PIN, INPUT_PULLUP );
pinMode( SW_2_PIN, INPUT_PULLUP );
// bBleKeyboard //
bleKeyboard.begin();
}
void loop() {
// 変数定義 //
static unsigned long SpeedMillis = millis();
static boolean ValueChange = true;
static int pos1 = 0;
static int Ex_pos1 = 0;
static int Opos2 = 0;
static int Ex_pos2 = 0;
static int XSW1 = 0;
static int XSW2 = 0;
int SW1 ;
int SW2 ;
static int Cmd_Num ;
static int BT_Flag = 0;
// 状態取得 //
encoder1->tick(); // just call tick() to check the state.
encoder2->tick();
int newPos1 = encoder1->getPosition();
int newPos2 = encoder2->getPosition();
SW1 = digitalRead(SW_1_PIN);
SW2 = digitalRead(SW_2_PIN);
if(bleKeyboard.isConnected() and BT_Flag == 0) {
ValueChange = true;
BT_Flag = 1;
}
// イベント処理 //
// スイッチ1 //
if (XSW1 != SW1 and SpeedMillis + 100 < millis()) {
bleKeyboard.print("2");
XSW1 = SW1;
ValueChange = true;
SpeedMillis = millis();
}
// スイッチ2 //
if ( XSW2 != SW2 and SpeedMillis + 100 < millis()) {
if ( SW2 == 1 ) {
function_call(Cmd_Num);
}
delay(100);
XSW2 = SW2;
ValueChange = true;
SpeedMillis = millis();
}
// マスコンダイアル
if (Ex_pos2 != newPos2) {
if(bleKeyboard.isConnected()) {
if ((newPos2-Ex_pos2) > 8 ) { // 高速移動
bleKeyboard.print("c");
Serial.println("c");
} else if ((newPos2-Ex_pos2) > 0 ) {
bleKeyboard.print("x");
Serial.println("x");
} else if ((newPos2-Ex_pos2) < -8 ) { // 高速移動
bleKeyboard.print("d");
Serial.println("d");
} else if ((newPos2-Ex_pos2) < 0 ) {
bleKeyboard.print("s");
Serial.println("s");
}
bleKeyboard.releaseAll();
// bleKeyboard.print("Hello world");
// bleKeyboard.write(KEY_RETURN);
// bleKeyboard.write(KEY_MEDIA_PLAY_PAUSE);
// bleKeyboard.press(KEY_LEFT_CTRL);
// bleKeyboard.press(KEY_LEFT_ALT);
// bleKeyboard.press(KEY_DELETE);
}
Ex_pos2 = newPos2 ;
ValueChange = true;
}
// セレクタダイアル
pos1 = (newPos1+1)*0.5 ;
if (Ex_pos1 != pos1) {
Cmd_Num -= (pos1 -Ex_pos1) ;
if (Cmd_Num < 0) {
Cmd_Num = Cmd_MaxNum -1 ;
}
if (Cmd_Num > Cmd_MaxNum - 1 ) {
Cmd_Num = 0 ;
}
Ex_pos1 = pos1 ;
ValueChange = true;
}
// 処理実行 //
if ( ValueChange ) {
display.clearDisplay();
Draw_Meter(Cmd_Num);
display.display();
ValueChange = false;
}
}
void Draw_Meter(int Cmd_Num) {
display.fillRect( 0, 26, SCREEN_WIDTH, 40, WHITE ) ;
// Status //
display.setTextSize(1);
if(bleKeyboard.isConnected()) {
display.fillRect( 0, 0, SCREEN_WIDTH, 14, WHITE ) ;
display.setTextColor(SSD1306_BLACK, SSD1306_WHITE); // Draw 'inverse' text
display.setCursor(23,5);
display.print("BT Connected");
} else {
display.fillRect( 0, 0, SCREEN_WIDTH, 14, WHITE ) ;
display.fillRect( 5, 2, SCREEN_WIDTH-10, 10, BLACK ) ;
display.setTextColor(SSD1306_WHITE, SSD1306_BLACK);
display.setCursor(17,4);
display.print("BT Not Connected");
}
// Select //
display.setTextSize(2);
display.setTextColor(SSD1306_BLACK, SSD1306_WHITE); // Draw 'inverse' text
display.setCursor(20 + Cmd_Tab[Cmd_Num],40);
display.print(Cmd_Caption[Cmd_Num]);
}
void function_call(int cmdnum){
// 後日、スマートに書き直す //
switch (cmdnum) {
case 0:
bleKeyboard.print(" "); //電源
break;
case 1:
bleKeyboard.print("q"); //停止
break;
case 2:
bleKeyboard.print("z"); //方向
break;
case 3:
bleKeyboard.print("0"); //以下ファンクション F0-F28
break;
case 4:
bleKeyboard.print("1");
break;
case 5:
bleKeyboard.print("2");
break;
case 6:
bleKeyboard.print("3");
break;
case 7:
bleKeyboard.print("4");
break;
case 8:
bleKeyboard.print("5");
break;
case 9:
bleKeyboard.print("6");
break;
case 10:
bleKeyboard.print("7");
break;
case 11:
bleKeyboard.print("8");
break;
case 12:
bleKeyboard.print("9");
break;
case 13:
bleKeyboard.press(KEY_LEFT_SHIFT);
bleKeyboard.print("0");
bleKeyboard.releaseAll();
break;
case 14:
bleKeyboard.press(KEY_LEFT_SHIFT);
bleKeyboard.print("1");
bleKeyboard.releaseAll();
break;
case 15:
bleKeyboard.press(KEY_LEFT_SHIFT);
bleKeyboard.print("2");
bleKeyboard.releaseAll();
break;
case 16:
bleKeyboard.press(KEY_LEFT_SHIFT);
bleKeyboard.print("3");
bleKeyboard.releaseAll();
break;
case 17:
bleKeyboard.press(KEY_LEFT_SHIFT);
bleKeyboard.print("4");
bleKeyboard.releaseAll();
break;
case 18:
bleKeyboard.press(KEY_LEFT_SHIFT);
bleKeyboard.print("5");
bleKeyboard.releaseAll();
break;
case 19:
bleKeyboard.press(KEY_LEFT_SHIFT);
bleKeyboard.print("6");
bleKeyboard.releaseAll();
break;
case 20:
bleKeyboard.press(KEY_LEFT_SHIFT);
bleKeyboard.print("7");
bleKeyboard.releaseAll();
break;
case 21:
bleKeyboard.press(KEY_LEFT_SHIFT);
bleKeyboard.print("8");
bleKeyboard.releaseAll();
break;
case 22:
bleKeyboard.press(KEY_LEFT_SHIFT);
bleKeyboard.print("9");
bleKeyboard.releaseAll();
break;
case 23:
bleKeyboard.press(KEY_LEFT_CTRL);
bleKeyboard.print("0");
bleKeyboard.releaseAll();
break;
case 24:
bleKeyboard.press(KEY_LEFT_CTRL);
bleKeyboard.print("1");
bleKeyboard.releaseAll();
break;
case 25:
bleKeyboard.press(KEY_LEFT_CTRL);
bleKeyboard.print("2");
bleKeyboard.releaseAll();
break;
case 26:
bleKeyboard.press(KEY_LEFT_CTRL);
bleKeyboard.print("3");
bleKeyboard.releaseAll();
break;
case 27:
bleKeyboard.press(KEY_LEFT_CTRL);
bleKeyboard.print("4");
bleKeyboard.releaseAll();
break;
case 28:
bleKeyboard.press(KEY_LEFT_CTRL);
bleKeyboard.print("5");
bleKeyboard.releaseAll();
break;
case 29:
bleKeyboard.press(KEY_LEFT_CTRL);
bleKeyboard.print("6");
bleKeyboard.releaseAll();
break;
case 30:
bleKeyboard.press(KEY_LEFT_CTRL);
bleKeyboard.print("7");
bleKeyboard.releaseAll();
break;
case 31:
bleKeyboard.press(KEY_LEFT_CTRL);
bleKeyboard.print("8");
bleKeyboard.releaseAll();
break;
}
}
