JUGEMテーマ:電子工作
AQM1602Y-NLW-FBWをESP32のマイクロパイソンから使う
小型のキャラクタディスプレーAQM1602シリーズ
I2Cで使えるため非常に便利です。
ずっと前やった記事はArduinoで制御する方法でしたが
https://ameblo.jp/fc2miha/entry-12833772879.html
今回ESP32からMicropythonで制御したので、
記録しておきます。
参考
https://jhalfmoon.com/dbc/2021/05/17/micropython%E7%9A%84%E5%8D%88%E7%9D%A122-%E3%83%A9%E3%82%BA%E3%83%91%E3%82%A4pico%E3%80%81aqm1602-lcd%E3%83%91%E3%83%8D%E3%83%AB%E6%8E%A5%E7%B6%9A/
Raspberry Pi Picoの記述ですが、ESP32のMicropythonでそのままで行けました。
で、それだけでは芸が無いので
ずっと前にやったオリジナルキャラを追加して、表示してみましたので。参考になる場合はどうぞ。
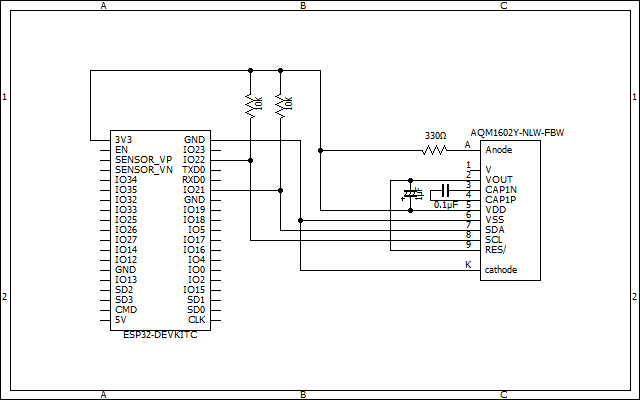
■回路
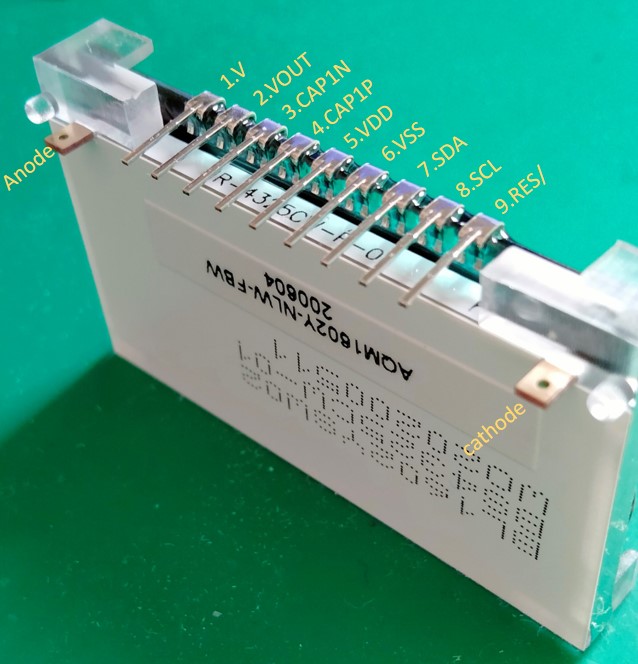
■ピン配置
■プログラム
上の参考にしたプログラムにオリジナルキャラの作成とカーソル位置の指定、カーソル位置からの文字表示、画面クリアなど追加しています。
#
#AQM1602Y-NLW-FBW
#16桁2行 キャラクタディスプレー制御
# 独自キャラクタ追加
#
#接続
# ESP32 AQM
# 22 ----- SCL
# 21 ---- SDA
#
import time
from machine import Pin, I2C
import sys
time.sleep(3.5)
print("AQM1602 Build0.1")
i2c=I2C(0, scl=Pin(22), sda=Pin(21), freq=400000)
display_address = 0x3E
display_data = 0x40
diaplsy_command = 0x00
def writeData(dat):
i2c.writeto_mem(display_address, display_data, bytes([dat & 0xFF]), addrsize=8)
time.sleep_ms(1)
def writeCommand(com):
i2c.writeto_mem(display_address, diaplsy_command, bytes([com & 0xFF]), addrsize=8)
time.sleep_ms(1)
def initDisplay():
time.sleep_ms(100)
writeCommand(0x38) #FunctionSet
time.sleep_ms(20)
writeCommand(0x39) #FunctionSet 拡張モードへ移行
time.sleep_ms(20)
writeCommand(0x14) #
time.sleep_ms(20)
writeCommand(0x73) #コントラスト下4ビット
time.sleep_ms(20)
writeCommand(0x56) #3.3Vで動かす場合は0x56みたい。
time.sleep_ms(20)
writeCommand(0x6C)
time.sleep_ms(20)
writeCommand(0x38) #FunctionSet 拡張モード終了
time.sleep_ms(20)
writeCommand(0x01) #ClearDisplay
time.sleep_ms(20)
writeCommand(0x0C) #DisplayON CursorOFF BlinkOFF
time.sleep_ms(20)
#参考情報
# flags for display on/off control
# LCD_DISPLAYON 0x04
# LCD_DISPLAYOFF 0x00
# LCD_CURSORON 0x02
# LCD_CURSOROFF 0x00
# LCD_BLINKON 0x01
# LCD_BLINKOFF 0x00
#行出力
def writeLine(nL, lin):
buf = bytearray(lin)
if len(buf) <= 0:
return False
if len(buf) > 16:
buf = buf[0, 16]
if nL == 0:
writeCommand(0x80)
else:
writeCommand(0xC0)
for idx in range(0, len(buf)):
writeData(buf[idx])
#カーソル位置に文字列出力
def writeString(lin):
buf = bytearray(lin)
if len(buf) <= 0:
return False
if len(buf) > 16:
buf = buf[0, 16]
for idx in range(0, len(buf)):
writeData(buf[idx])
#画面消去
def clearDisplay() :
writeCommand(0x01)
time.sleep_ms(2)
#オリジナルキャラ作成
def createChar(location, charmap) :
location = location & 0x07 # 8個のオリジナルキャラが作れる
writeCommand(0x40 | (location << 3));
for i in range(0, 8) :
writeData(charmap[i]);
#カーソル位置指定
def setCursorAQM1602(col, row) :
if row == 0 :
offset = 0x00
else :
offset = 0x40
writeCommand(0x80 | (col + offset))
time.sleep_ms(2)
#
#
#
initDisplay() #初期化
#文字出力
writeLine(0, "Hello, コンバンワ!")
writeLine(1, "1234567890ABCDEF")
time.sleep(3)
#クリア
clearDisplay()
#年
b = bytearray(8)
b[0] = 0b10000
b[1] = 0b11111
b[2] = 0b00100
b[3] = 0b11111
b[4] = 0b10100
b[5] = 0b11111
b[6] = 0b00100
b[7] = 0b00000
createChar(0, b) #キャラクタ追加
#月
b[0] = 0b01111
b[1] = 0b01001
b[2] = 0b01111
b[3] = 0b01001
b[4] = 0b01111
b[5] = 0b01001
b[6] = 0b10001
b[7] = 0b00000
createChar(1, b) #キャラクタ追加
#日
b[0] = 0b11111
b[1] = 0b10001
b[2] = 0b10001
b[3] = 0b11111
b[4] = 0b10001
b[5] = 0b10001
b[6] = 0b11111
b[7] = 0b00000
createChar(2, b) #キャラクタ追加
#
nen=bytearray(1)
nen[0]=0
getu=bytearray(1)
getu[0]=1
hi=bytearray(1)
hi[0]=2
setCursorAQM1602(0, 0)
writeString("2022")
writeString(nen)
writeString("11")
writeString(getu)
writeString("13")
writeString(hi)
setCursorAQM1602(6, 1) #カーソル位置変更 x=6 y=1
writeString("XYZ")
setCursorAQM1602(12, 0) #カーソル位置変更 x=12 y=0
kigou=bytearray(2)
kigou[0]=0xfb
kigou[1]=0xfc
writeString(kigou)
time.sleep(3)
#クリア
clearDisplay()
#
c = bytearray(1)
count = 0
while True:
x = count % 16
y = int(count / 16) % 2
setCursorAQM1602(x, y)
c[0]=count
writeString(c)
count = count + 1
if count > 255 :
count = 0
clearDisplay()
time.sleep_ms(100)
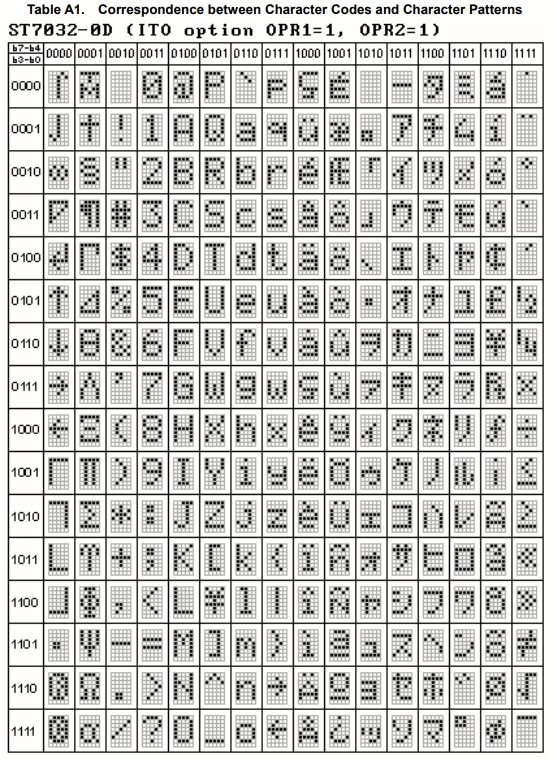
■コード表