I2CでarduinoとReaspberyPIと通信する(analogRead)
RaspberryPIではアナログの入力ピンが用意されていないので別途用意する必要があるみたいです。
今回はRaspberryPIとAndroidをI2C通信で通信させてRaspberryPIからの指示でanalogReadします。
arduino側は
こちらのスケッチを入れて起動しておく。
#include <Wire.h>
int SLAVE_ADDRESS = 0x38;
int analogPin = 0;
boolean ledOn = false;
void setup(){
Serial.begin(9600);
Serial.println("start");
Wire.begin(SLAVE_ADDRESS);
Wire.onReceive(onI2C_Receive);
Wire.onRequest(onI2CRequestData);
}
void loop(){
}
void onI2C_Receive(int n){
char ch = Wire.read();
if(ch<=0x09){
analogPin = ch;
Serial.print("analog_ch = ");
Serial.println(analogPin);
}
if(ch>=0x10){ //ここの部分は今回のプログラムには関係が無い
int data = Wire.read();
Serial.print("data = [");
Serial.print(data);
Serial.println("]");
}
}
void onI2CRequestData()
{
Serial.println("onI2CRequestData start ");
int value = analogRead(analogPin);
unsigned char buf[3];
buf[0]=value>>8;
buf[1]=value&0xff;
Wire.write(buf, 2);
Serial.print("analogPin = ");
Serial.println(analogPin);
Serial.print("value = ");
Serial.println(value);
}
■プログラム解説
#include <Wire.h>
→I2C通信を行うときはこれをinclude
Wire.begin(SLAVE_ADDRESS);
→SLAVEとして初期化する SLAVE_ADDRESSには今回は0x38を入れておきます。
Wire.onReceive(onI2C_Receive);
→RaspberryPIからデータが送信された時に呼び出される関数を登録します。
Wire.onRequest(onI2CRequestData);
→RaspberryPIがデータ読み出しを行った時に呼び出される関数を登録します。
Wire.read();
→I2Cで1バイト読み込み
Wire.write(buf, 2);
→I2Cで2バイト書込み
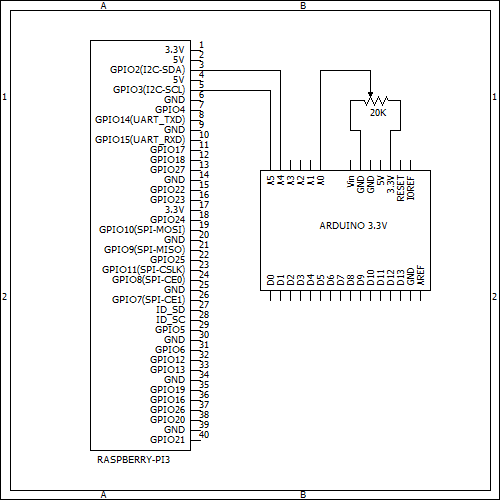
■接続
arduino RaspberryPI
A4(SDA) --- GPIO2(I2C_SDA1)
A5(SCL) --- GPIO3(I2C_SCL1)
ちなみに、RaspberryPIが3VなのでArduinoも3Vのやつを推奨。
3VのArduinoの作り方は「https://ameblo.jp/fc2miha/entry-12833772799.html
」です。
■回路図
■ここから下はRaspberryPI側の設定になります。
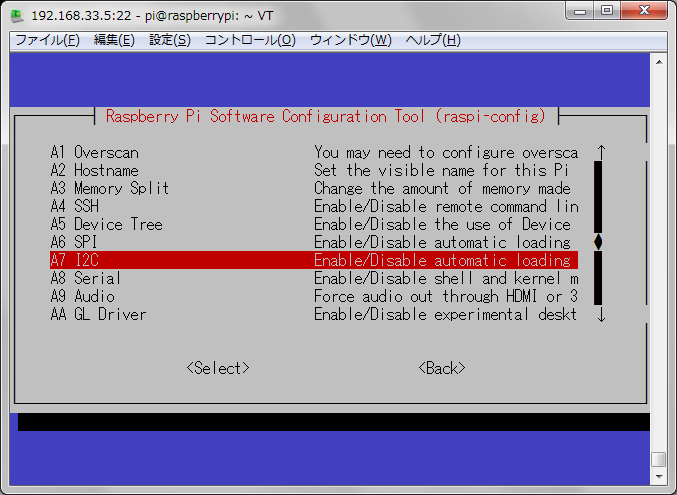
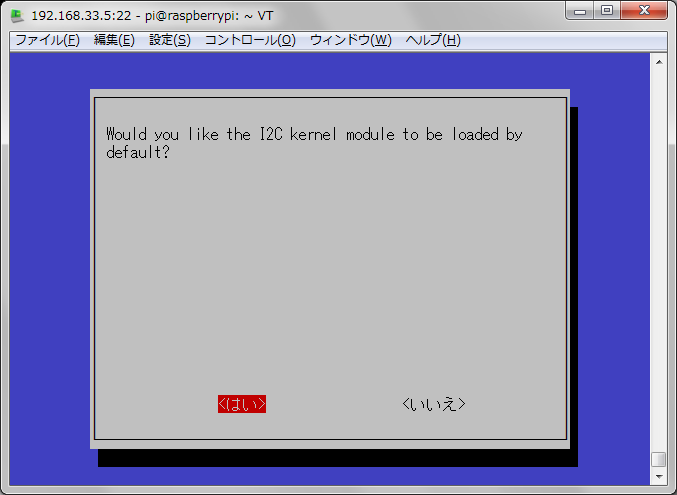
■raspberryPIのI2Cを有効にする
sudo raspi-config


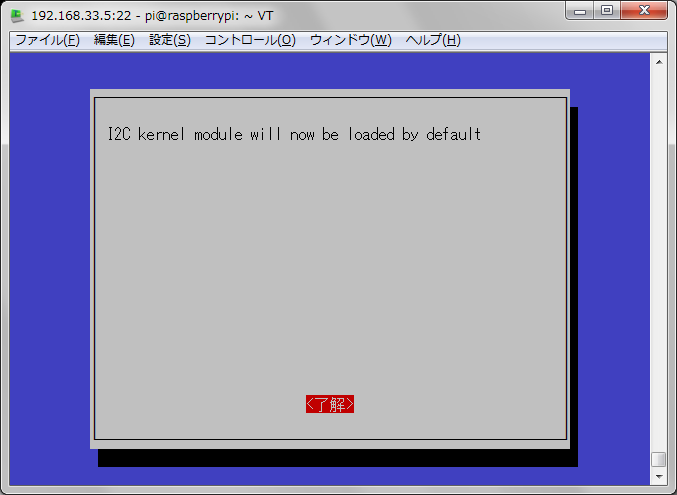
再起動して。
I2Cデバイスの確認
pi@raspberrypi:~ $ ls -l /dev/
合計 0
------------- 省略 -------------
crw-rw---- 1 root i2c 89, 1 5月 28 10:19 i2c-1
------------- 省略 -------------
i2c-1があるのでOK。
Raspberryの種類により最後の数字部分が変わるらしい。
次に
とりあえず、ちゃんと認識されているかを確認する。為にi2c-toolsをインストール
sudo apt-get install i2c-tools
認識しているかをi2cdetectで確認する。
pi@raspberrypi:~/program/06.I2CtoArduino $ sudo /usr/sbin/i2cdetect -y 1
0 1 2 3 4 5 6 7 8 9 a b c d e f
00: -- -- -- -- -- -- -- -- -- -- -- -- --
10: -- -- -- -- -- -- -- -- -- -- -- -- -- -- -- --
20: -- -- -- -- -- -- -- -- -- -- -- -- -- -- -- --
30: -- -- -- -- -- -- -- -- 38 -- -- -- -- -- -- --
40: -- -- -- -- -- -- -- -- -- -- -- -- -- -- -- --
50: -- -- -- -- -- -- -- -- -- -- -- -- -- -- -- --
60: -- -- -- -- -- -- -- -- -- -- -- -- -- -- -- --
70: -- -- -- -- -- -- -- --
pi@raspberrypi:~/program/06.I2CtoArduino $
予定通り0x38で認識されているので、
RaspberryPIのプログラムを入れて行きます。
C言語版です。
1 #include <stdio.h>
2 #include <stdlib.h>
3 #include <string.h>
4 #include <unistd.h>
5 #include <fcntl.h>
6 #include <sys/ioctl.h>
7 #include <linux/i2c-dev.h>
8
9 int main(int argc, char **argv)
10 {
11 int fd;
12 unsigned char i2c_slave_addres; //arduino側のslaveアドレス
13 unsigned char i2c_register; //arduino側のanalogのピン番号
14 unsigned char buf[2];
15 char device[256];
16
17 if (argc != 4) {
18 fprintf(stderr, "i2c i2c_device_path i2c_slave_addres arduino_analog_no ¥n");
19 fprintf(stderr, "ex...¥n i2c /dev/i2c-1 56 0¥n¥n");
20 return 1;
21 }
22
23 //
24 //入力パラメーターを取得
25 //
26 strcpy(device, argv[1]);
27 i2c_slave_addres = atoi(argv[2]);
28 i2c_register = atoi(argv[3]);
29
30 //
31 //i2cデバイスを開く
32 //
33 if ((fd = open(device, O_RDWR)) < 0) {
34 printf("error open ¥n");
35 return 1;
36 }
37 if(ioctl(fd, I2C_SLAVE, i2c_slave_addres) < 0) {
38 printf("error ioctl¥n");
39 return 1;
40 }
41
42 //
43 //arduinoへ送信する。analogPIN番号を書き込む
44 //writeを行うとarduino側の「Wire.onReceive(onI2C_Receive);で登録した関数が動く」
45 //
46 if ((write(fd, &i2c_register, 1)) != 1) {
47 fprintf(stderr, "error write¥n");
48 return 1;
49 }
50 //Ack?を取得 0x71が返ってくる
51 if (read(fd, buf, 1) != 1) {
52 fprintf(stderr, "error read¥n");
53 return 1;
54 }
55 printf("%02x¥n", buf[0]);
56 //
57 //arduinoへの指示を書き込む 2バイト
58 //ここの部分は今回のプログラムの目的とはあまり関係ない
59 //単純にRaspberryPI→arduino方向への通信
60 //
61 buf[0]=0x10;
62 buf[1]=0x02;
63 if ((write(fd, buf, 2)) != 2) {
64 fprintf(stderr, "error write¥n");
65 return 1;
66 }
67 //Ack?を取得 0x71が返ってくる
68 if (read(fd, buf, 1) != 1) {
69 fprintf(stderr, "error read¥n");
70 return 1;
71 }
72 printf("%02x¥n", buf[0]);
73 while(1){
74 //
75 //arduinoからの応答を読み込む 2バイト 0~1023
76 //readを行うとarduino側の「Wire.onRequest(onI2CRequestData)で登録した関数が動く」
77 //
78 if (read(fd, buf, 2) != 2) {
79 fprintf(stderr, "error read¥n");
80 return 1;
81 }
82 //printf("%02x¥n", buf[0]);
83 //printf("%02x¥n", buf[1]);
84 int value = buf[0]*256 + buf[1];
85 printf("%d¥n", value);
86 }
87 return 0;
88 }
■実行
arduinoのanalog0に接続されている可変抵抗にかかっている電圧を
analogReadで取り込み、その値がI2C通信でRaspberryPIに送られて来ます。