さてさて。
前回で一応
あと
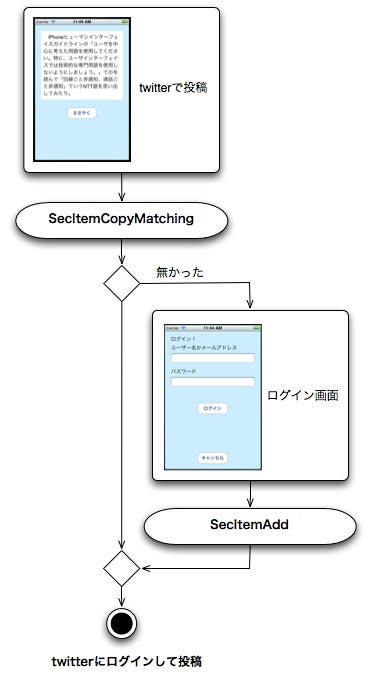
のフローで、Keychain Services API直呼び出しってのもなんなんで、管理用のクラスとして

name:アカウント名
password:パスワード
fetch:キーチェインにアカウントが保存されているか知らべ、保存されていたらname、passwordに取り出す。
update:現在設定されているname、passwordをキーチェインに保存。ただしnameがnilの場合は既存のキーチェインに保存されたアカウントのクリア
てのを用意。
で、ここらへんをテストできるプロジェクトを作成してみようちゅーわけです。
じゃあ、さっそくテストプロジェクトから。
File>New>New Project…メニューを選んでNavigation-based Application選択。

プロジェクト名はpasswordとして、CoreDataやUnit Testsはチェックしない。

ソースコントロールは自分の好みで。
ブログのサンプルは基本OFFでいきます。
ソ、ソースコントロールってなんすか?な人は、【iPhoneアプリ開発ドリル】SCMでソース変更を管理するを読みましょう。

gitリポジトリの形で公開するとか、非公開ならバンバン活用すべし!
できあがったプロジェクトはそのままRunボタン押すとお約束の画面になるんで

RootViewController.mのメソッドをちょい書き換え。

てすることで、以下のフロー

A、Bどちらのテストもできるようになる。

あとはtableView:didSelectRowAtIndexPath:メソッドを以下のようにして
test_LoginComplite、test_LoginFaileにテストしたい処理を用意っす。
ここで、最初に用意するとしたAccountクラスのインスタンスを使うわけですな。
ということで、こいつをFile>New>New File…メニューでCocoa touchのObjective-Classを
選んで

親クラスにNSObjectを指定

名前をAccountとして、出来上がったAccount.m/hを以下のように編集。
Account.h
Account.m
ま、いったんこれでGUIを作ってテストしてみましょう。
モーダル画面はその(199)とかの応用でXIB使って作るのが妥当なんですが、今回は実験を兼ねて、ZIBファイル抜きで作ります。
Accountと同じ要領で用意するんだけど、今度はUIViewController subclassを選んで

親クラスをUITableViewController、with XIB for user interfaceはチェックしません。

名前はAccountViewControllerにしますた。

とりあえず、こいつの実装は後回しにして、RootViewController.mに戻ってAccountViewControllerをモーダルビューとして呼び出してみます。
ナビゲーションでドリルダウンするなら、テンプレートに用意してくれてる
を使えばいいんだけど、今回はモーダルビューなんでpresentModalViewControllerを使うのと、以下のようにCancel、Doneボタンをナビバーに出したいんで、新しくUINavigationControllerを作って、そのrootViewControllerとしてAccountViewControllerインスタンスを渡してます。
モーダルビュー?名人は【iPhoneアプリ開発ドリル】モーダルビューを表示する(1)、(2)あたりを参照してちょ。

UIBarButtonItemのtarget、actionには自分のメソッドを指定。
こうやると、AccountViewController側はいじらずにCancel、Doneボタン付きでモーダル表示できるわけですな。
実行すると、こんな感じ。
この時点で「ログインを成功させる」、「ログインを失敗させる」項目タップでAccountViewController画面が出て、Cancel、Doneボタンで閉じるとこまで完成。

UINavigationControllerを新規に作ってる過程がわからん人はその(168)~その(171)の激闘の記録を読むべし。
あとはAccountViewController.m側で
としてやれば

て感じで、それっぽい画面になるわけっす。
でもって、アカウントとパスワードを入力できるように、tableView:cellForRowAtIndexPath:メソッドでUITableViewCellのcontentViewにUITextFieldを埋め込んでやればOK。
UITextFieldの扱いに関してはその(193)が役立っとります。
それと、このテーブルの項目はセレクトできてもしょうがないんでself.tableView.allowsSelection = NOにしときます。
動かすとこんな感じなる。
パスワードの方は文字が表示されないようにsecureTextEntryプロパティをYESにしている。

ついでにkeyboardTypeを指定してやる事で、例えばアカウント名によく使われるEメールアドレスを打ち込むのに便利なキーボードを出すようにもしてる。

enablesReturnKeyAutomaticallyをYESにすると、文字が空の時は自動的にリターンキーが押せなくなる。

で、このリターンキーはキーボードを閉じるためのトリガーにしたかったんで、AccountViewController.hの親クラスUITableViewControllerにUITextFieldDelegateプロトコルを継承させておき
あと、リターンとは意味合いが違うのでキー名も
として、returnじゃなくDoneに変更してます。
UITextFieldインスタンスはcellじゃなく、contentViewにちょっと余白有りで埋め込み。ここらへんは個人の好きずきですな。

今回は削除ボタンや移動、チェックマークは使わないんで、あまり意味は無いんだけどcontentViewに
で埋め込んでると、削除ボタンとか表示されたとき、自動的にリサイズしてくれるので便利。
ただし、これだけだとアカウント名、パスワードの受け渡しができないんで、受け渡し用にAccountViewController.hにも
を追加して、RootViewController.mのshowAccountViewメソッドで
とすれば、任意の文字列を渡せるようになり、tableView:cellForRowAtIndexPath:メソッドを
と変更することで受け取ったname、passwordが初期値として使われるようになる。
あとはUITextFieldDelegateのtextFieldDidEndEditing:メソッドを実装する事で
編集された文字列でname、passwordが更新されることになるんで、RootViewController.mのdoneAccountViewメソッドで
とすれば、AccountViewController側で設定されたnameとpasswordがコンソールに表示される。
dismissModalViewControllerAnimated:メソッドを最初に呼ぶのは、もしキーボードが出っぱなしでDoneボタン押されてた場合の対応。キーボードが閉じないとdetailViewController.nameやdetailViewController.passwordに最後の内容が入らない。
気をつけないといけないのは、dismissModalViewControllerAnimated:YESでないと駄目な事。NOだと、その場でモーダル画面が閉じられてAccountViewControllerもreleaseされてしまう。
NOの場合で対応したいなら、dismissModalViewControllerAnimated前にdetailViewControllerを取り出しておいて、retain、doneAccountViewメソッド抜ける前にreleaseってのでいけると思います。
AccountViewController.mのdeallocで
とする事も忘れずに。
これで、GUIはほぼ完成。あとはRootViewController.mのshowAccountViewメソッドとdoneAccountViewメソッドでAccountクラスのインスタンスを使ってアカウント情報を設定していけばいいわけですな。
RootViewController.hに
RootViewController.mに
て感じでAccountを使うパターンに変えて以下次回!
------------
サンプルプロジェクト:password.zip
前回で一応
Keychain Services
の離陸準備はできたんで、今度はGUI側を用意します。あと
のフローで、Keychain Services API直呼び出しってのもなんなんで、管理用のクラスとして
name:アカウント名
password:パスワード
fetch:キーチェインにアカウントが保存されているか知らべ、保存されていたらname、passwordに取り出す。
update:現在設定されているname、passwordをキーチェインに保存。ただしnameがnilの場合は既存のキーチェインに保存されたアカウントのクリア
てのを用意。
で、ここらへんをテストできるプロジェクトを作成してみようちゅーわけです。
じゃあ、さっそくテストプロジェクトから。
File>New>New Project…メニューを選んでNavigation-based Application選択。
プロジェクト名はpasswordとして、CoreDataやUnit Testsはチェックしない。
ソースコントロールは自分の好みで。
ブログのサンプルは基本OFFでいきます。
ソ、ソースコントロールってなんすか?な人は、【iPhoneアプリ開発ドリル】SCMでソース変更を管理するを読みましょう。
gitリポジトリの形で公開するとか、非公開ならバンバン活用すべし!
できあがったプロジェクトはそのままRunボタン押すとお約束の画面になるんで
RootViewController.mのメソッドをちょい書き換え。
- (NSInteger)tableView:(UITableView *)tableView
numberOfRowsInSection:(NSInteger)section
{
return 2;
}
- (UITableViewCell *)tableView:(UITableView *)tableView
cellForRowAtIndexPath:(NSIndexPath *)indexPath
{
・
・
・
cell.textLabel.text = (indexPath.row == 0)?
@"ログインを成功させる":@"ログインを失敗させる";
return cell;
}
numberOfRowsInSection:(NSInteger)section
{
return 2;
}
- (UITableViewCell *)tableView:(UITableView *)tableView
cellForRowAtIndexPath:(NSIndexPath *)indexPath
{
・
・
・
cell.textLabel.text = (indexPath.row == 0)?
@"ログインを成功させる":@"ログインを失敗させる";
return cell;
}
てすることで、以下のフロー
A、Bどちらのテストもできるようになる。
あとはtableView:didSelectRowAtIndexPath:メソッドを以下のようにして
- (void)test_LoginComplite
{
}
- (void)test_LoginFaile
{
}
- (void)tableView:(UITableView *)tableView
didSelectRowAtIndexPath:(NSIndexPath *)indexPath
{
if (indexPath.row == 0)
[self test_LoginComplite];
else if (indexPath.row == 1)
[self test_LoginFaile];
}
{
}
- (void)test_LoginFaile
{
}
- (void)tableView:(UITableView *)tableView
didSelectRowAtIndexPath:(NSIndexPath *)indexPath
{
if (indexPath.row == 0)
[self test_LoginComplite];
else if (indexPath.row == 1)
[self test_LoginFaile];
}
test_LoginComplite、test_LoginFaileにテストしたい処理を用意っす。
ここで、最初に用意するとしたAccountクラスのインスタンスを使うわけですな。
ということで、こいつをFile>New>New File…メニューでCocoa touchのObjective-Classを
選んで
親クラスにNSObjectを指定
名前をAccountとして、出来上がったAccount.m/hを以下のように編集。
Account.h
@interface Account : NSObject {
}
@property (nonatomic, retain) NSString* name;
@property (nonatomic, retain) NSString* password;
- (void)fetch;
- (void)update;
@end
}
@property (nonatomic, retain) NSString* name;
@property (nonatomic, retain) NSString* password;
- (void)fetch;
- (void)update;
@end
Account.m
@implementation Account
@synthesize name, password;
- (void)fetch
{
}
- (void)update
{
}
@end
@synthesize name, password;
- (void)fetch
{
}
- (void)update
{
}
@end
ま、いったんこれでGUIを作ってテストしてみましょう。
モーダル画面はその(199)とかの応用でXIB使って作るのが妥当なんですが、今回は実験を兼ねて、ZIBファイル抜きで作ります。
Accountと同じ要領で用意するんだけど、今度はUIViewController subclassを選んで
親クラスをUITableViewController、with XIB for user interfaceはチェックしません。
名前はAccountViewControllerにしますた。
とりあえず、こいつの実装は後回しにして、RootViewController.mに戻ってAccountViewControllerをモーダルビューとして呼び出してみます。
ナビゲーションでドリルダウンするなら、テンプレートに用意してくれてる
[self.navigationController pushViewController:detailViewController animated:YES];
を使えばいいんだけど、今回はモーダルビューなんでpresentModalViewControllerを使うのと、以下のようにCancel、Doneボタンをナビバーに出したいんで、新しくUINavigationControllerを作って、そのrootViewControllerとしてAccountViewControllerインスタンスを渡してます。
モーダルビュー?名人は【iPhoneアプリ開発ドリル】モーダルビューを表示する(1)、(2)あたりを参照してちょ。
UIBarButtonItemのtarget、actionには自分のメソッドを指定。
こうやると、AccountViewController側はいじらずにCancel、Doneボタン付きでモーダル表示できるわけですな。
#import "RootViewController.h"
#import "AccountViewController.h"
・
・
・
- (void)showAccountView {
AccountViewController *detailViewController
= [[AccountViewController alloc] initWithStyle:UITableViewStyleGrouped];
UINavigationController* nav = [[UINavigationController alloc]
initWithRootViewController:detailViewController];
detailViewController.navigationItem.leftBarButtonItem
= [[[UIBarButtonItem alloc]
initWithBarButtonSystemItem:UIBarButtonSystemItemCancel
target:self
action:@selector(cancelAccountView)] autorelease];
detailViewController.navigationItem.rightBarButtonItem
= [[[UIBarButtonItem alloc]
initWithBarButtonSystemItem:UIBarButtonSystemItemDone
target:self
action:@selector(doneAccountView)] autorelease];
[detailViewController release];
[self.navigationController presentModalViewController:nav animated:YES];
[nav release];
}
- (void)cancelAccountView
{
[self dismissModalViewControllerAnimated:YES];
}
- (void)doneAccountView
{
[self dismissModalViewControllerAnimated:YES];
}
- (void)test_LoginComplite
{
[self showAccountView];
}
- (void)test_LoginFaile
{
[self showAccountView];
}
実行すると、こんな感じ。
この時点で「ログインを成功させる」、「ログインを失敗させる」項目タップでAccountViewController画面が出て、Cancel、Doneボタンで閉じるとこまで完成。
UINavigationControllerを新規に作ってる過程がわからん人はその(168)~その(171)の激闘の記録を読むべし。
あとはAccountViewController.m側で
- (NSInteger)numberOfSectionsInTableView:(UITableView *)tableView
{
return 2;
}
- (NSInteger)tableView:(UITableView *)tableView numberOfRowsInSection:(NSInteger)section
{
return 1;
}
- (NSString *)tableView:(UITableView *)tableView titleForHeaderInSection:(NSInteger)section
{
if (section == 0)
return @"アカウント名";
return @"パスワード";
}
{
return 2;
}
- (NSInteger)tableView:(UITableView *)tableView numberOfRowsInSection:(NSInteger)section
{
return 1;
}
- (NSString *)tableView:(UITableView *)tableView titleForHeaderInSection:(NSInteger)section
{
if (section == 0)
return @"アカウント名";
return @"パスワード";
}
としてやれば
て感じで、それっぽい画面になるわけっす。
でもって、アカウントとパスワードを入力できるように、tableView:cellForRowAtIndexPath:メソッドでUITableViewCellのcontentViewにUITextFieldを埋め込んでやればOK。
UITextFieldの扱いに関してはその(193)が役立っとります。
それと、このテーブルの項目はセレクトできてもしょうがないんでself.tableView.allowsSelection = NOにしときます。
- (void)viewDidLoad
{
[super viewDidLoad];
self.tableView.allowsSelection = NO;
・
・
・
}
・
・
・
- (UITableViewCell *)tableView:(UITableView *)tableView
cellForRowAtIndexPath:(NSIndexPath *)indexPath
{
static NSString *CellIdentifier = @"Cell";
UITableViewCell *cell = [tableView dequeueReusableCellWithIdentifier:CellIdentifier];
if (cell == nil) {
cell = [[[UITableViewCell alloc] initWithStyle:UITableViewCellStyleDefault r
euseIdentifier:CellIdentifier] autorelease];
UITextField* editField = [[[UITextField alloc]
initWithFrame:CGRectInset(cell.contentView.bounds, 8, 2)] autorelease];
editField.autoresizingMask = UIViewAutoresizingFlexibleWidth
+UIViewAutoresizingFlexibleHeight;
editField.tag = indexPath.section + 1;
editField.delegate = self;
editField.enablesReturnKeyAutomatically = YES;
editField.returnKeyType = UIReturnKeyDone;
editField.keyboardType = (indexPath.section == 0)?
UIKeyboardTypeEmailAddress:UIKeyboardTypeASCIICapable;
editField.secureTextEntry = (indexPath.section == 1);
[cell.contentView addSubview:editField];
}
UITextField* editField = (UITextField*)[cell viewWithTag:indexPath.section + 1];
editField.text = @"test";
return cell;
}
- (BOOL)textFieldShouldReturn:(UITextField *)textField
{
[textField resignFirstResponder];
return YES;
}
{
[super viewDidLoad];
self.tableView.allowsSelection = NO;
・
・
・
}
・
・
・
- (UITableViewCell *)tableView:(UITableView *)tableView
cellForRowAtIndexPath:(NSIndexPath *)indexPath
{
static NSString *CellIdentifier = @"Cell";
UITableViewCell *cell = [tableView dequeueReusableCellWithIdentifier:CellIdentifier];
if (cell == nil) {
cell = [[[UITableViewCell alloc] initWithStyle:UITableViewCellStyleDefault r
euseIdentifier:CellIdentifier] autorelease];
UITextField* editField = [[[UITextField alloc]
initWithFrame:CGRectInset(cell.contentView.bounds, 8, 2)] autorelease];
editField.autoresizingMask = UIViewAutoresizingFlexibleWidth
+UIViewAutoresizingFlexibleHeight;
editField.tag = indexPath.section + 1;
editField.delegate = self;
editField.enablesReturnKeyAutomatically = YES;
editField.returnKeyType = UIReturnKeyDone;
editField.keyboardType = (indexPath.section == 0)?
UIKeyboardTypeEmailAddress:UIKeyboardTypeASCIICapable;
editField.secureTextEntry = (indexPath.section == 1);
[cell.contentView addSubview:editField];
}
UITextField* editField = (UITextField*)[cell viewWithTag:indexPath.section + 1];
editField.text = @"test";
return cell;
}
- (BOOL)textFieldShouldReturn:(UITextField *)textField
{
[textField resignFirstResponder];
return YES;
}
動かすとこんな感じなる。
パスワードの方は文字が表示されないようにsecureTextEntryプロパティをYESにしている。
ついでにkeyboardTypeを指定してやる事で、例えばアカウント名によく使われるEメールアドレスを打ち込むのに便利なキーボードを出すようにもしてる。
enablesReturnKeyAutomaticallyをYESにすると、文字が空の時は自動的にリターンキーが押せなくなる。
で、このリターンキーはキーボードを閉じるためのトリガーにしたかったんで、AccountViewController.hの親クラスUITableViewControllerにUITextFieldDelegateプロトコルを継承させておき
@interface AccountViewController : UITableViewController<UITextFieldDelegate> {
textFieldShouldReturn:メソッドをAccountViewController.mに実装してるわけです。やってる事はキーボード閉じるためにresignFirstResponderを呼んでるだけ。あと、リターンとは意味合いが違うのでキー名も
editField.returnKeyType = UIReturnKeyDone;
として、returnじゃなくDoneに変更してます。
UITextFieldインスタンスはcellじゃなく、contentViewにちょっと余白有りで埋め込み。ここらへんは個人の好きずきですな。
今回は削除ボタンや移動、チェックマークは使わないんで、あまり意味は無いんだけどcontentViewに
autoresizingMask = UIViewAutoresizingFlexibleWidth
+UIViewAutoresizingFlexibleHeight
+UIViewAutoresizingFlexibleHeight
で埋め込んでると、削除ボタンとか表示されたとき、自動的にリサイズしてくれるので便利。
ただし、これだけだとアカウント名、パスワードの受け渡しができないんで、受け渡し用にAccountViewController.hにも
@property (nonatomic, retain) NSString* name;
@property (nonatomic, retain) NSString* password;
@property (nonatomic, retain) NSString* password;
を追加して、RootViewController.mのshowAccountViewメソッドで
- (void)showAccountView {
・
・
・
detailViewController.navigationItem.rightBarButtonItem
= [[[UIBarButtonItem alloc]
initWithBarButtonSystemItem:UIBarButtonSystemItemDone
target:self
action:@selector(doneAccountView)] autorelease];
detailViewController.name = @"name";
detailViewController.password = @"password";
[detailViewController release];
・
・
・
}
・
・
・
detailViewController.navigationItem.rightBarButtonItem
= [[[UIBarButtonItem alloc]
initWithBarButtonSystemItem:UIBarButtonSystemItemDone
target:self
action:@selector(doneAccountView)] autorelease];
detailViewController.name = @"name";
detailViewController.password = @"password";
[detailViewController release];
・
・
・
}
とすれば、任意の文字列を渡せるようになり、tableView:cellForRowAtIndexPath:メソッドを
- (UITableViewCell *)tableView:(UITableView *)tableView
cellForRowAtIndexPath:(NSIndexPath *)indexPath
{
・
・
・
UITextField* editField = (UITextField*)[cell viewWithTag:indexPath.section + 1];
if (editField.tag == 1)
editField.text = name;
else
editField.text = password;
return cell;
}
cellForRowAtIndexPath:(NSIndexPath *)indexPath
{
・
・
・
UITextField* editField = (UITextField*)[cell viewWithTag:indexPath.section + 1];
if (editField.tag == 1)
editField.text = name;
else
editField.text = password;
return cell;
}
と変更することで受け取ったname、passwordが初期値として使われるようになる。
あとはUITextFieldDelegateのtextFieldDidEndEditing:メソッドを実装する事で
- (void)textFieldDidEndEditing:(UITextField *)textField
{
if (textField.tag == 1)
self.name = textField.text;
else
self.password = textField.text;
}
{
if (textField.tag == 1)
self.name = textField.text;
else
self.password = textField.text;
}
編集された文字列でname、passwordが更新されることになるんで、RootViewController.mのdoneAccountViewメソッドで
- (void)doneAccountView
{
[self dismissModalViewControllerAnimated:YES];
UINavigationController* nav
= (UINavigationController*)self.navigationController.modalViewController;
AccountViewController *detailViewController
= (AccountViewController*)[nav.viewControllers objectAtIndex:0];
printf("name = %s password = %s\n", [detailViewController.name UTF8String],
[detailViewController.password UTF8String]);
}
とすれば、AccountViewController側で設定されたnameとpasswordがコンソールに表示される。
dismissModalViewControllerAnimated:メソッドを最初に呼ぶのは、もしキーボードが出っぱなしでDoneボタン押されてた場合の対応。キーボードが閉じないとdetailViewController.nameやdetailViewController.passwordに最後の内容が入らない。
気をつけないといけないのは、dismissModalViewControllerAnimated:YESでないと駄目な事。NOだと、その場でモーダル画面が閉じられてAccountViewControllerもreleaseされてしまう。
NOの場合で対応したいなら、dismissModalViewControllerAnimated前にdetailViewControllerを取り出しておいて、retain、doneAccountViewメソッド抜ける前にreleaseってのでいけると思います。
AccountViewController.mのdeallocで
- (void)dealloc
{
[name release];
[password release];
[super dealloc];
}
{
[name release];
[password release];
[super dealloc];
}
とする事も忘れずに。
これで、GUIはほぼ完成。あとはRootViewController.mのshowAccountViewメソッドとdoneAccountViewメソッドでAccountクラスのインスタンスを使ってアカウント情報を設定していけばいいわけですな。
RootViewController.hに
@class Account;
@interface RootViewController : UITableViewController {
Account* account;
}
@interface RootViewController : UITableViewController {
Account* account;
}
RootViewController.mに
#import "Account.h"
@implementation RootViewController
- (void)viewDidLoad
{
[super viewDidLoad];
if (account == nil)
account = [[Account alloc] init];
}
・
・
- (void)showAccountView {
・
・
detailViewController.name = account.name;
detailViewController.password = account.password;
・
・
- (void)doneAccountView
{
・
・
account.name = detailViewController.name;
account.password = detailViewController.password;
・
・
- (void)dealloc
{
[account release];
[super dealloc];
}
て感じでAccountを使うパターンに変えて以下次回!
------------
サンプルプロジェクト:password.zip