
[macOS]Day One Classic 書類
Day One Classicという日記アプリを使っているが、今後のことを考えて、自家製アプリに移行することを考えている。
Day Oneの同期データの種類は、以下のとおり。
- Day One
独自サーバ。 - iCloud
探せばデータを見つけることは出来るが、見えないと考えるべきか。
~/Library/Mobile Documents/*~com~dayoneapp~dayone/Documents/Journal_dayone - Dropbox
データは見える場所。
~/Dropbox/アプリ/Day\ One/Journal.dayone
Dropboxでのディレクトリ構成は以下のとおり
Day One
 +- Journal.dayone
    +- entries
    |    1A573C0B559248A991C4AC0F0EA8B1E7.doentry
    |    1FB23D983DF341079532B0F9381BCFCC.doentry
    |    :
    +- photos
         1A573C0B559248A991C4AC0F0EA8B1E7.jpg
         2D37E853754E43EFBA0FFBAEEB6A8B40.jpg
         :
entries配下のファイルは、plistのよう。
<?xml version="1.0" encoding="UTF-8"?>
<!DOCTYPE plist PUBLIC "-//Apple//DTD PLIST 1.0//EN" "http://www.apple.com/DTDs/PropertyList-1.0.dtd">
<plist version="1.0">
<dict>
	<key>Activity</key>
	<string>Automotive</string>
	<key>Creation Date</key>
	<date>2016-07-18T08:51:34Z</date>
	<key>Creator</key>
	<dict>
		<key>Device Agent</key>
		<string>iPhone/iPhone7,2</string>
		<key>Generation Date</key>
		<date>2016-07-18T08:51:34Z</date>
		<key>Host Name</key>
		<string>iPhone6GB128Gold</string>
		<key>OS Agent</key>
		<string>iOS/9.3.2</string>
		<key>Software Agent</key>
		<string>Day One iOS/1.17.9</string>
	</dict>
	<key>Entry Text</key>
	<string>AT教習のゼッケン
下で待つ。準備なし</string>
:
この内容を読み取るコードを書いてみた。保存先を選択する。
    @IBAction func buttonPushed(sender: AnyObject) {
        let openPanel = NSOpenPanel()
        openPanel.allowsMultipleSelection = false
        openPanel.canChooseDirectories = true
        openPanel.canCreateDirectories = false
        openPanel.canChooseFiles = false
        openPanel.begin { (result) -> Void in
            if result == NSFileHandlingPanelOKButton {
                let inst = KeepADiary()
                inst.dump(url: openPanel.urls[0])
            }
        }
    }
内容をダンプ。
class KeepADiary {
    public func dump(url: URL) -> Void {
        print(url)
        var entriesUrl = url
        entriesUrl.appendPathComponent("entries", isDirectory: true)
        print(entriesUrl)
        var fileList: [String] {
            do {
                return try FileManager.default.contentsOfDirectory(atPath: entriesUrl.path)
            } catch {
                return []
            }
        }
        for fileName in fileList {
            var fileUrl = entriesUrl
            fileUrl.appendPathComponent(fileName)
            let plistXML: NSData = FileManager.default.contents(atPath: fileUrl.path)! as NSData
            let temp = try! PropertyListSerialization.propertyList(from:plistXML as Data, options: [], format: nil) as! [String:Any]
            print(temp)
        }
    }
}
https://github.com/murakami/KeepADiary - GitHub
関連情報 Cocoa勉強会 BUKURO.swift (connpass)
Swift勉強会 関東 (connpass)
Cocoa勉強会 BUKURO.swift (ATND)
Cocoa勉強会 BUKURO.swift (Peatix)
MOSA BUKURO.swift (connpass)
【Cocoa練習帳】 http://www.bitz.co.jp/weblog/
http://ameblo.jp/bitz/(ミラー・サイト)
[Xcode]Cross-platform
Xcodeでクロスプラットフォームなプロジェクトの生成方法を試行錯誤してみて、自分なりのやり方を考えてみた。
Xcodeのクロスプラットフォームなプロジェクトな雛形として、ゲーム系プロジェクトが用意されているので、どんなプロジェクトが生成されるのか試してみる。

単独のプロジェクトではターゲット名がプロダクト名となっているが、クロスプラットフォームなプロジェクトのターゲット名は、macOSやiOSとなっていた。

これを参考することにした。
空のプロジェクトを生成する。

ターゲットmacOSを追加する。

ターゲット名をmacOSとすると、更生がスッキリする。

その代わり、バンドルIDと商品名を修正する必要がある。
 ソースコード GitHubからどうぞ。
https://github.com/murakami/KeepADiary - GitHub
関連情報 Cocoa勉強会 BUKURO.swift (connpass)
Swift勉強会 関東 (connpass)
Cocoa勉強会 BUKURO.swift (ATND)
Cocoa勉強会 BUKURO.swift (Peatix)
MOSA BUKURO.swift (connpass)
【Cocoa練習帳】 http://www.bitz.co.jp/weblog/
http://ameblo.jp/bitz/(ミラー・サイト)
[お金を扱う]カード決済
FeliCaに対応したiPhone 7 (jp)の登場で、iOS関連のカード決済が盛り上がってきたので、カードを使った決済について調べてみた。
| カード | クレジットカード |
| 銀聯カード | |
| 電子マネー | 交通系IC |
| QUICPay | |
| iD |
NFC TYPE-A/BとFeliCa(NFC TYPE-F)の関係がよくわからなかったのだが、前者は非接触EMVのクレジットカードで利用され、後者は電子マネーで利用されているようで、両者に対応したサービスにお目にかかれないのは、これが理由のようだ。
関連情報 Cocoa勉強会 BUKURO.swift (connpass)Swift勉強会 関東 (connpass)
Cocoa勉強会 BUKURO.swift (ATND)
Cocoa勉強会 BUKURO.swift (Peatix)
MOSA BUKURO.swift (connpass)
【Cocoa練習帳】 http://www.bitz.co.jp/weblog/
http://ameblo.jp/bitz/(ミラー・サイト)
[BUKURO.swift]空配列
関東swift勉強会2017-7 で発表した小ネタ。各言語での個数0の空配列を宣言する方法だ。
Java
String[] array = new String[0];
C#
string[] array = new string[] {};
Objective-C
NSArray *array = [[NSArray alloc] init];
NSArray *array = @[];
Swift
var array: String[] = []
var array: Array = []
var array = String[]()
関連情報
関東swift勉強会2017-7
Cocoa勉強会 BUKURO.swift (connpass)
Swift勉強会 関東 (connpass)
Cocoa勉強会 BUKURO.swift (ATND)
MOSA BUKURO.swift (connpass)
【Cocoa練習帳】
http://www.bitz.co.jp/weblog/
http://ameblo.jp/bitz/(ミラー・サイト)
[BUKURO.swift]人工知能を実装する「意味ネットワーク」
知能を製作するためには、いろいろな道がある。
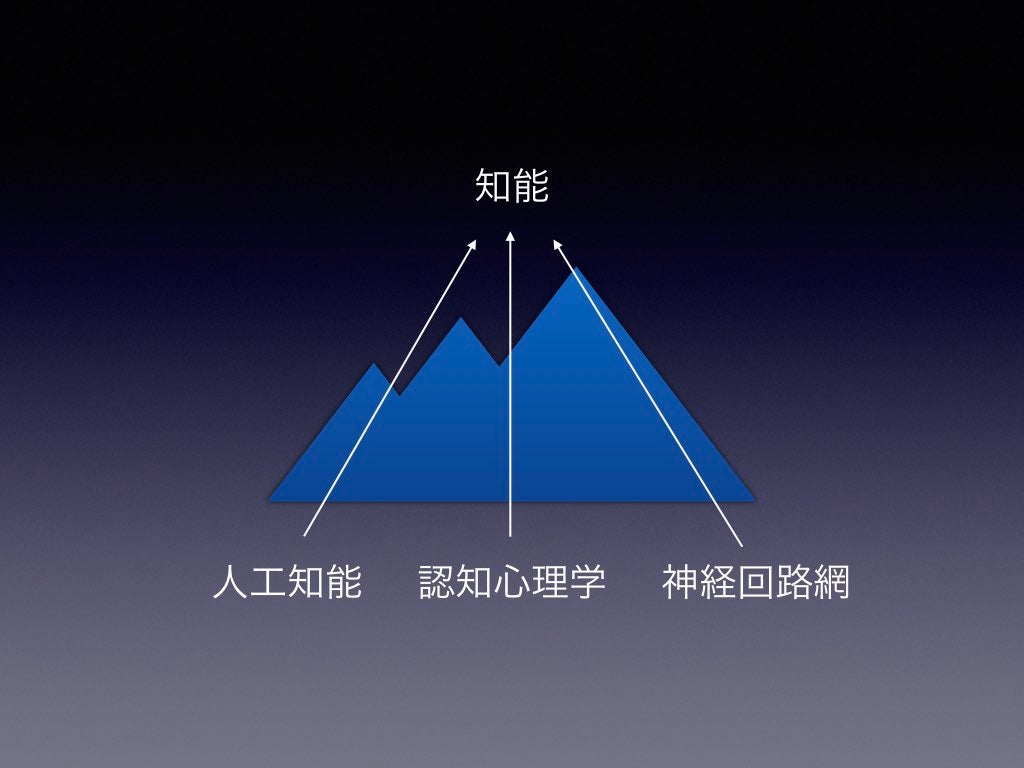
知識表現は様々。人工知能の研究の歴史は知識表現の歴史といってもいい?

意味ネットワーク

これを実装の観点から生まれたのが?フレーム・システムかな?
 ソースコード
GitHubからどうぞ。
ソースコード
GitHubからどうぞ。https://github.com/murakami/workbook/tree/master/mac/Semantic - GitHub
関連情報 Turbo Cによる人工知能
Cocoa勉強会 BUKURO.swift (connpass)
Swift勉強会 関東 (connpass)
Cocoa勉強会 BUKURO.swift (ATND)
MOSA BUKURO.swift (connpass)
【Cocoa練習帳】 http://www.bitz.co.jp/weblog/
http://ameblo.jp/bitz/(ミラー・サイト)
[BUKURO.swift]Machスレッドスタック
Swift勉強会 関東で、Darwinのスタックについて話題となったので調べてみた。
UNIXプログラムのメモリモデル

Machプログラムのメモリモデル
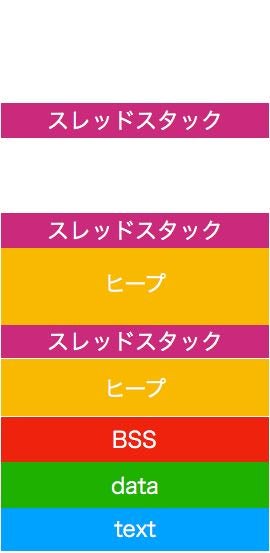
UNIXプログラムのメモリモデルだと、メモリが確保できる限り、スタックは確保できるが、Machプログラムのメモリモデルだと、決められたサイズのスレッドスタックが確保されるので、メモリに余裕があっても、スタックが枯渇するという現象が発生する。なので、再帰呼び出しは避けた方がいい。
関連情報
Machオペレーティングシステム―プログラミングと概念
Cocoa勉強会 BUKURO.swift (connpass)
Swift勉強会 関東 (connpass)
Cocoa勉強会 BUKURO.swift (ATND)
MOSA BUKURO.swift (connpass)
【Cocoa練習帳】
http://www.bitz.co.jp/weblog/
http://ameblo.jp/bitz/(ミラー・サイト)
[BUKURO.swift]WWDC2017
MOSA BUKURO.swift #10 の発表資料。WWDC2017からきになる項目をリストアップした。
- WWDC.family
- https://wwdc.family/
- 参加者同士で位置情報を共有。
- Apple File System (APFS)
- macOSでもAPFSが標準に。
- What's New in Audio
- AVAudioEngine
- OS8から存在していたが気づいていませんでした。
- AudioUnitのCocoa版?
- AudioUnit Ver.3
- AudioUnit がバージョンアップ。
- そもそも、バージョン番号があることを知らなかった。
- Metal 2
- virtual reality (VR) 対応
- Debug
- 最適化
- MusicKit
- API for the Apple Music subscription service
- 簡単に分かりやすく説明すると、アプリからiPodが利用できるということ?
- Core ML
- Machine learning
- High Efficiency Image File Format (HEIF) and High Efficiency Video Coding (HEVC)
- 画像ファイルの書式
- H.265
- ARKit
- カメラとモーション機能の統合
- https://developer.apple.com/documentation/arkit/understanding_augmented_reality
- natural language processing (NLP) API
- 自然言語処理のフレームワーク
- new Drag and Drop APIs
- iOSでドラッグ&ドロップ実装をサポートするAPIが追加?
- Vision
- 特徴の検出など
- Core MLが利用されている。
- Depth API
- iPhone 7 Plus のカメラで測定されたデータを利用するフレームワーク。
- Filesアプリ
- 各機器のストレージの内容をクラウド経由で同期させる。
- これを想定したファイル管理APIが?
- ColorSync
- APIがCocoaフレームワークされた?
- PDFKit
- ついに、iOSでも。
- Identity Lookup
- メッセージのフィルタ
- DeviceCheck
- サーバでの利用も想定
- 初回起動判定などで利用できる
- FileProvider
- Filesアプリ関連で、異なるアプリ間でファイルを共有する口?
- Core NFC
- iOSをメンバー管理や、鉄道の利用状況アクセスが期待できる?
- Suicaの乗車履歴が読み取れる?
- StoreKit
- 変更があった?
- Xcode
- GitHub
- Debugging and Analysis
- Runtime Sanitizers
- Testing and Continuous Integration
- Wireless Development
- App Store
- 段階的アップデート
- 使用していないアプリの削除機能
Cocoa勉強会 BUKURO.swift (connpass)
Swift勉強会 関東 (connpass)
Cocoa勉強会 BUKURO.swift (ATND)
MOSA BUKURO.swift (connpass)
【Cocoa練習帳】 http://www.bitz.co.jp/weblog/
http://ameblo.jp/bitz/(ミラー・サイト)
[Swift]ポインタを引数に持つC言語の関数
先日の『BUKURO.swift x AKIBA.swift 合同勉強会』で説明したコードは、withUnsafeMutablePointer(to:_:) の使用方法に間違いがあった。正しい記述内容が分かったので発表する。
withUnsafeMutablePointer(to:_:) は、ポインタを引数に持つC言語の関数をSwiftで利用するt目の総称型関数だ。
func withUnsafeMutablePointer(to arg: inout T, _ body: (UnsafeMutablePointer) throws -> Result) rethrows -> Result
正しい記述内容は、以下のとおり。
var valueQueryResult: AnyObject?
result = withUnsafeMutablePointer(to: &valueQueryResult) {
    SecItemCopyMatching(valueQuery as CFDictionary, UnsafeMutablePointer($0))
}
渡したい変数valueQueryResultの型は、AnyObject? 。
withUnsafeMutablePointer()の引数toにポインタを渡す。
C言語の関数はクロージャ内で呼び出す。
この関数の戻り値は、クロージャの返した値を返す。クロージャ内のコードが式1つならその値を戻り値として返すので、SecItemCopyMatching() の戻り値は、resultに設定される。
ここを理解していなくて間違えていた。
ソースコード GitHubからどうぞ。
https://github.com/murakami/workbook/tree/master/ios/Identifier - GitHub
関連情報 BUKURO.swift x AKIBA.swift 合同勉強会
Cocoa Study 池袋 (connpass)
Cocoa勉強会 関東 (connpass)
Cocoa Study (ATND)
BUKURO.swift (connpass)
【Cocoa練習帳】 http://www.bitz.co.jp/weblog/
http://ameblo.jp/bitz/(ミラー・サイト)
[macOS]ヘルパ・オブジェクト
今回は、ヒレガス本の日本語版初版のヘルパ・オブジェクトの章。サンプルは、前回のものの拡張だ。
最新の開発環境との違いが出る原因の一つが、今回もStoryboard。
ヒレガス本で説明されている、オブジェクト関連図は以下のとおり。
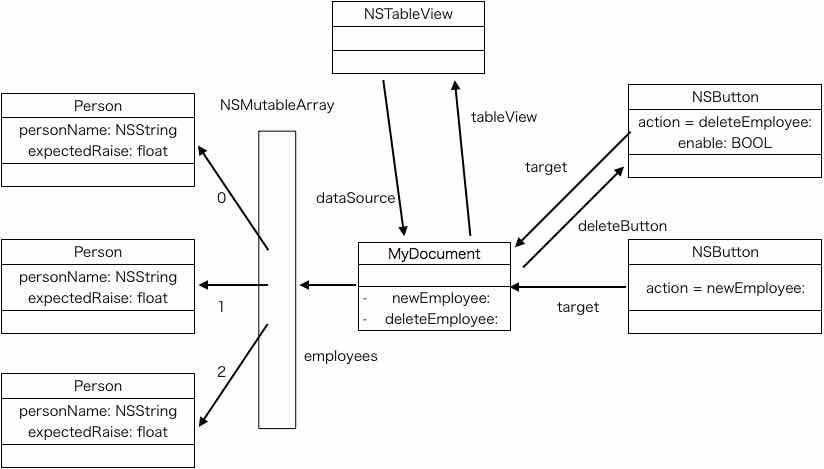
以前のMyDocumentの部分、Storyboardを利用した場合、NSViewControllerが間に入るため、Viewに関連するコードはViewControllerに、モデル管理のコードはDocumentに、とした。

Objective-Cではキー値コーディングを活用するのが賢明で、ヒレガス本では動的な記述をされていた。Swift時代、Swiftyな感覚だと異なる方法が選択されると思うが、Swiftだとどうなるのか試してみたかったので、したがってみた。
    /* カラム:行に表示するインスタンスを返す */
    func tableView(_ aTableView: NSTableView,
                   objectValueFor tableColumn: NSTableColumn?,
                   row: Int) -> Any? {
        let identifier = tableColumn?.identifier
        let person = myDocument?.employees[row]
        return person?.value(forKey: identifier!)
    }
    /* 入力されたインスタンスを受け取る */
    func tableView(_ aTableView: NSTableView,
                   setObjectValue object: Any?,
                   for tableColumn: NSTableColumn?,
                   row: Int) {
        let identifier = tableColumn?.identifier
        let person = myDocument?.employees[row]
        person?.setValue(object, forKey: identifier!)
    }
最後にはまったところ。最新の環境でテーブルビューを作成すると、View Basedとなるが、ヒレガス本はCell Based。Cell Basedにすれば動くのだが、せっかくなので、View Basedに挑戦。NSTableViewDelegateの対応が必要になる。
これがCell Basedの場合。
    func tableView(_ aTableView: NSTableView,
                   objectValueFor tableColumn: NSTableColumn?,
                   row: Int) -> Any? {
        let identifier = tableColumn?.identifier
        let person = myDocument?.employees[row]
        return person?.value(forKey: identifier!)
    }
View Based<だと以下となる。/p>
    func tableView(_ tableView: NSTableView, viewFor tableColumn: NSTableColumn?, row: Int) -> NSView? {
        let cell = tableView.make(withIdentifier: (tableColumn?.identifier)!, owner: self) as! NSTableCellView
        let person = myDocument?.employees[row]
        if let tcol = tableColumn {
            let identifier = tcol.identifier
            if(identifier == "personName") {
                cell.textField?.stringValue = person?.value(forKey: identifier) as! String
            }
            else if(identifier == "expectedRaise") {
                cell.textField?.floatValue = person?.value(forKey: identifier) as! Float
            }
        }
        return cell
    }
ソースコード GitHubからどうぞ。
https://github.com/murakami/workbook/tree/master/mac/RaiseMan - GitHub
関連情報 Aaron Hillegass
Cocoa Study (connpass)
Cocoa勉強会 (connpass)
Cocoa Study (ATND)
BUKURO.swift (connpass)
【Cocoa練習帳】 http://www.bitz.co.jp/weblog/
http://ameblo.jp/bitz/(ミラー・サイト)
[macOS]Document-based Application
今回は、ヒレガス本の日本語版初版のコントロールの章。サンプルは、Document-based Applicationだ。
以前の開発環境との大きな違いは、NSViewControllerがiOSのUIViewControllerに近づいたのとStoryboardだ。最新の環境でもStorybardを使用しないで新規プロジェクトを生成すると、以前に近いのだが、Sgtoryboardを使用すると大きく異なる。
macOSではInterfaceBuilderは汎用的で、nibのFile's Ownerに設定されるクラスは多様だ。iOSではUIViewControllerなど、File's Ownerに設定されるクラスの種類は少なように感じるが、これがmacOSアプリケーションの開発を難しく感じてしまう原因の一つではないかと思っている。
Storyboardを使わない場合、Document.xibが生成され、ウィンドウに配置されたコントローラに対するOutletとActionはDocumentクラスに用意されることになる。
class Document: NSDocument {
    @IBOutlet public weak var deleteButton: NSButton!
    @IBOutlet public weak var nextButton: NSButton!
    @IBOutlet public weak var previousButton: NSButton!
    @IBOutlet public weak var nameField: NSTextField!
    @IBOutlet public weak var raiseField: NSTextField!
    @IBOutlet public weak var box: NSBox!

    @IBAction func nextEmployee(sender: AnyObject) {
    }

    @IBAction func previousEmployee(sender: AnyObject) {
    }

    @IBAction func deleteEmployee(sender: AnyObject) {
    }

    @IBAction func newEmployee(sender: AnyObject) {
    }
}
Storyboardを使った場合、OutletはViewControllerで持つのが自然だろう。Actionについては、ViewControllerでも、DocumentでもどちらでもOKだが、今回は、ViewControllerで持ち、ViewControllerがDocumentを操作し、Documentの更新を通知でViewControlelrで受けるようにした。
import Cocoa

class ViewController: NSViewController {

    @IBOutlet public weak var deleteButton: NSButton!
    @IBOutlet public weak var nextButton: NSButton!
    @IBOutlet public weak var previousButton: NSButton!
    @IBOutlet public weak var nameField: NSTextField!
    @IBOutlet public weak var raiseField: NSTextField!
    @IBOutlet public weak var box: NSBox!

    var myDocument: Document?

    override func awakeFromNib() {
        self.view.window?.initialFirstResponder = self.nameField
    }

    override func viewDidLoad() {
        super.viewDidLoad()
    }

    override var representedObject: Any? {
        didSet {
        }
    }

    override func viewWillAppear() {
        super.viewWillAppear()

        self.myDocument = self.view.window?.windowController?.document as? Document
        NotificationCenter.default.addObserver(self,
                                               selector: #selector(type(of: self).updateUI(notification:)),
                                               name: Document.updateKey,
                                               object: nil)
    }

    override func viewWillDisappear() {
        NotificationCenter.default.removeObserver(self, name: Document.updateKey, object: nil)
        super.viewWillDisappear()
    }

    @IBAction func nextEmployee(sender: AnyObject) {
        self.myDocument?.nextEmployee(personName: nameField.stringValue, expectedRaise: raiseField.floatValue)
    }

    @IBAction func previousEmployee(sender: AnyObject) {
        self.myDocument?.previousEmployee(personName: nameField.stringValue, expectedRaise: raiseField.floatValue)
    }

    @IBAction func deleteEmployee(sender: AnyObject) {
        self.myDocument?.deleteEmployee()
    }

    @IBAction func newEmployee(sender: AnyObject) {
        self.myDocument?.newEmployee(personName: nameField.stringValue, expectedRaise: raiseField.floatValue)
    }

    @objc private func updateUI(notification: Notification) {
        let recordText = "Record \((self.myDocument?.currentIndex)! + 1) of \(self.myDocument?.employees.count)"
        let currentEmployee = self.myDocument?.employees[(self.myDocument?.currentIndex)!]
        nameField.stringValue = (currentEmployee?.personName)!
        raiseField.floatValue = (currentEmployee?.expectedRaise)!
        box.title = recordText
        previousButton.isEnabled = ((self.myDocument?.currentIndex)! > 0)
        nextButton.isEnabled = ((self.myDocument?.currentIndex)! < ((self.myDocument?.employees.count)! - 1))
        deleteButton.isEnabled = ((self.myDocument?.employees.count)! > 1)
    }
}
import Cocoa

class Person {
    public var personName: String = "New Employee"
    public var expectedRaise: Float = 0.0
}

class Document: NSDocument {
    public static let updateKey = NSNotification.Name("updateUI")

    public var employees = [Person]()
    public var currentIndex: Int = 0

    override init() {
        super.init()
        createNewEmployee()
    }

    override class func autosavesInPlace() -> Bool {
        return true
    }

    override func makeWindowControllers() {
        let storyboard = NSStoryboard(name: "Main", bundle: nil)
        let windowController = storyboard.instantiateController(withIdentifier: "Document Window Controller") as! NSWindowController
        self.addWindowController(windowController)
    }

    override func data(ofType typeName: String) throws -> Data {
        throw NSError(domain: NSOSStatusErrorDomain, code: unimpErr, userInfo: nil)
    }

    override func read(from data: Data, ofType typeName: String) throws {
        throw NSError(domain: NSOSStatusErrorDomain, code: unimpErr, userInfo: nil)
    }

    public func nextEmployee(personName: String, expectedRaise: Float) {
        updateEmployee(personName: personName, expectedRaise: expectedRaise)
        currentIndex += 1
        updateUI()
    }

    public func previousEmployee(personName: String, expectedRaise: Float) {
        updateEmployee(personName: personName, expectedRaise: expectedRaise)
        currentIndex -= 1
        updateUI()
    }

    public func deleteEmployee() {
        employees.remove(at: currentIndex)
        if currentIndex != 0 {
            currentIndex -= 1
        }
        updateUI()
    }

    public func newEmployee(personName: String, expectedRaise: Float) {
        updateEmployee(personName: personName, expectedRaise: expectedRaise)
        createNewEmployee()
        updateUI()
    }

    private func createNewEmployee() {
        let newEmployee = Person()
        employees.append(newEmployee)
        currentIndex = employees.count - 1
    }

    private func updateEmployee(personName: String, expectedRaise: Float) {
        var currentEmployee = employees[currentIndex]
        currentEmployee.personName = personName
        currentEmployee.expectedRaise = expectedRaise
    }

    private func updateUI() {
        NotificationCenter.default.post(name: Document.updateKey, object: nil, userInfo: nil)
    }
}
次に問題になったのは、NSWindowのinitialFirstResponder。Storyboardを使わない場合、WindowのOutletをViewにつなぐことができるが、Storyboardを使う場合は、別Sceneなので繋げられない。
今回は、awakeFromNib()で、コードで設定するようにした。
class ViewController: NSViewController {¥
    override func awakeFromNib() {
        self.view.window?.initialFirstResponder = self.nameField
    }
}
今回は、Cocoa勉強会で知り合った方々の情報で課題が解決できた。ありがとう。
ソースコード GitHubからどうぞ。https://github.com/murakami/workbook/tree/master/mac/RaiseMan - GitHub
関連情報 storyboardの中のNSWindow initialFirstResponderが効かない問題について (2)
Aaron Hillegass
Cocoa Study (connpass)
Cocoa勉強会 (connpass)
Cocoa Study (ATND)
MOSA (connpass)
【Cocoa練習帳】 http://www.bitz.co.jp/weblog/
http://ameblo.jp/bitz/(ミラー・サイト)