ルデコのブログ -2ページ目

Wi-Fi画像転送ESP-32

Wi-Fi画像転送ESP-32テスト中。


240x240 ST7789 DisplayにパソコンからWi-Fiで送った画像を表示してます。

スケッチ
#include <WiFi.h>
#include <JPEGDecoder.h>
#include <Adafruit_GFX.h>   // Core graphics library by Adafruit
#include <Arduino_ST7789.h> // Hardware-specific library for ST7789 (with or without CS pin)
#include <SPI.h>

#define TFT_DC 19   // ?
#define TFT_RST 15  // LCDのリセット用(SPI関係ない)

#define TFT_MOSI 21 // SDA for hardware SPI data pin (all of available pins)
#define TFT_SCLK 18 // SCL for hardware SPI sclk pin (all of available pins)

const char AP_DEMO_HTTP_200_IMAGE[] = "HTTP/1.1 200 OK\r\nPragma: public\r\nCache-Control: max-age=1\r\nExpires: Thu, 26 Dec 2016 23:59:59 GMT\r\nContent-Type: image/";

typedef enum
{
    UPL_AP_STAT_MAIN = 1,           // GET /
    UPL_AP_STAT_LED_HIGH,           // GET /H
    UPL_AP_STAT_LED_LOW,            // GET /L
    UPL_AP_STAT_GET_IMAGE,          // GET /logo.bmp
    UPL_AP_STAT_GET_FAVICON,        // GET /favicon.ico
    UPL_AP_STAT_POST_UPLOAD,        // POST /upload
    UPL_AP_STAT_POST_START_BOUNDRY, // POST /upload boundry
    UPL_AP_STAT_POST_GET_BOUNDRY,   // POST /upload boundry
    UPL_AP_STAT_POST_START_IMAGE,   // POST /upload image
    UPL_AP_STAT_POST_GET_IMAGE,     // POST /upload image
} UPL_AP_STAT_t;

#define WIFI_SSID "xxxxxxxxxx"
#define WIFI_PASSWORD "xxxxxxxxx"

Arduino_ST7789 tft = Arduino_ST7789(TFT_DC, TFT_RST, TFT_MOSI, TFT_SCLK); //for display with CS pin
#define LED_PIN 4

WiFiServer server(80);

#define MAX_IMAGE_SIZE 65535
#define MAX_BUF_SIZE 1024
//#define IMAGE_DEBUG

int value = 0;
char boundbuf[MAX_BUF_SIZE];
int boundpos = 0;
char imagetypebuf[MAX_BUF_SIZE];
int imagetypepos = 0;
char imagebuf[MAX_IMAGE_SIZE];
int imagepos = 0;

void setup()
{
    bool ret;

    Serial.begin(115200);

    // We start by connecting to a WiFi network
    Serial.println();
    Serial.println();
    Serial.println("WiFi Connecting.");

    WiFi.begin(WIFI_SSID, WIFI_PASSWORD);

    while (WiFi.status() != WL_CONNECTED)
    {
        delay(500);
        Serial.print(".");
    }
    Serial.println(WiFi.localIP());

    server.begin();

    tft.init(240, 240); // initialize a ST7789 chip, 240x240 pixels
    tft.fillScreen(BLACK);
    tft.setRotation(3);
}

void printUploadForm(WiFiClient client)
{
    Serial.println("printUploadForm");
    // HTTP headers always start with a response code (e.g. HTTP/1.1 200 OK)
    // and a content-type so the client knows what's coming, then a blank line:
    client.println("HTTP/1.1 200 OK");
    client.println("Content-type:text/html");
    client.println();
    client.println("<html>");
    client.println("<body>");
    client.println();
    client.println("<form action=\"upload\" method=\"post\" enctype=\"multipart/form-data\">");
    client.println("Select image to upload:");
    client.println("<input type=\"file\" name=\"fileToUpload\" id=\"fileToUpload\">");
    client.println("<input type=\"submit\" value=\"Upload Image\" name=\"submit\">");
    client.println("</form>");
    client.println();
    client.println("</body>");
    client.println("</html>");

    client.println();
}

void printImage(WiFiClient client)
{
    Serial.println("printImage");
    // HTTP headers always start with a response code (e.g. HTTP/1.1 200 OK)
    // and a content-type so the client knows what's coming, then a blank line:
    client.print(AP_DEMO_HTTP_200_IMAGE);
    client.print(imagetypebuf);
    client.print("\r\n\r\n");
#ifdef IMAGE_DEBUG
    Serial.print(AP_DEMO_HTTP_200_PNG);
#endif
    for (int i = 0; i < imagepos; i++)
    {
        client.write(imagebuf[i]);
#ifdef IMAGE_DEBUG
        Serial.write(imagebuf[i]);
#endif
    }
    drawArrayJpeg((uint8_t *)imagebuf, imagepos, 0, 0);
}

void printThanks(WiFiClient client)
{
    Serial.println("printThanks");
    // HTTP headers always start with a response code (e.g. HTTP/1.1 200 OK)
    // and a content-type so the client knows what's coming, then a blank line:
    client.println("HTTP/1.1 200 OK");
    client.println("Content-type:text/html");
    client.println();
    client.println("<html>");
    client.println("<body>");
    client.println();
    client.println("Thank You");
    client.println("<a id=\"logo\" href=\"/\"><img src=\"logo.bmp\" alt=\"logo\" border=\"0\"></a>");
    client.println();
    client.println("</body>");
    client.println("</html>");
    // the content of the HTTP response follows the header:
    //client.print("Click <a href=\"/H\">here</a> turn the LED on pin 5 on<br>");
    //client.print("Click <a href=\"/L\">here</a> turn the LED on pin 5 off<br>");

    // The HTTP response ends with another blank line:
    client.println();
}

void loop()
{
    int cnt;
    bool newconn = false;
    int stat;
    WiFiClient client = server.available(); // listen for incoming clients

    if (client)
    { // if you get a client,
        stat = 0;
        boundpos = 0;
        Serial.println("new client"); // print a message out the serial port
        String currentLine = "";      // make a String to hold incoming data from the client
        while (client.connected())
        { // loop while the client's connected
            cnt = client.available();
            if (cnt)
            { // if there's bytes to read from the client,
#ifdef IMAGE_DEBUG
                if (newconn == false)
                {
                    Serial.println(cnt);
                    newconn = true;
                }
#endif
                char c = client.read(); // read a byte, then
#ifndef IMAGE_DEBUG
                if (stat != UPL_AP_STAT_POST_GET_IMAGE)
                {
#endif
                    Serial.write(c); // print it out the serial monitor
#ifndef IMAGE_DEBUG
                }
#endif

                if (stat == UPL_AP_STAT_POST_GET_IMAGE)
                {
                    if (imagepos < MAX_IMAGE_SIZE)
                    {
                        imagebuf[imagepos] = c;
                        imagepos++;
                    }
                }
                if (c == '\n')
                { // if the byte is a newline character
#ifdef IMAGE_DEBUG
                    Serial.print("stat is equal=");
                    Serial.println(stat);
#endif
                    if (stat == UPL_AP_STAT_POST_START_BOUNDRY)
                    {
                        boundbuf[boundpos] = '\0';
                        boundpos++;
#ifdef IMAGE_DEBUG
                        Serial.println("&&&&&&&&&&&&&&&&&");
                        Serial.println(boundbuf);
                        Serial.println("&&&&&&&&&&&&&&&&&");
#endif
                        stat = UPL_AP_STAT_POST_UPLOAD;
                        Serial.println("stats=UPL_AP_STAT_POST_UPLOAD");
                    }
                    if (stat == UPL_AP_STAT_POST_START_IMAGE && currentLine.length() == 0)
                    {
                        imagetypebuf[imagetypepos] = '\0';
                        imagetypepos++;
#ifdef IMAGE_DEBUG
                        Serial.println("&&&&&&&&&&&&&&&&&");
                        Serial.println(imagetypebuf);
                        Serial.println("&&&&&&&&&&&&&&&&&");
#endif
                        imagepos = 0;
                        stat = UPL_AP_STAT_POST_GET_IMAGE;
                        Serial.println("stats=UPL_AP_STAT_POST_GET_IMAGE");
                    }
                    // if you got a newline, then clear currentLine:
                    currentLine = "";
                    newconn = false;
                }
                else if (c != '\r')
                {                     // if you got anything else but a carriage return character,
                    currentLine += c; // add it to the end of the currentLine
                    if (stat == UPL_AP_STAT_POST_START_BOUNDRY)
                    {
                        if (boundpos < MAX_BUF_SIZE)
                        {
                            boundbuf[boundpos] = c;
                            boundpos++;
                        }
                    }
                    if (stat == UPL_AP_STAT_POST_START_IMAGE)
                    {
                        if (imagetypepos < MAX_BUF_SIZE)
                        {
                            imagetypebuf[imagetypepos] = c;
                            imagetypepos++;
                        }
                    }
                }

                // Check to see if the client request was "GET / "
                if (currentLine.endsWith("GET / "))
                {
                    stat = UPL_AP_STAT_MAIN;
                    Serial.println("stats=UPL_AP_STAT_MAIN");
                }
                if (currentLine.endsWith("GET /logo.bmp "))
                {
                    stat = UPL_AP_STAT_GET_IMAGE;
                    Serial.println("stats=UPL_AP_STAT_GET_IMAGE");
                }
                if (currentLine.endsWith("POST /upload "))
                {
                    stat = UPL_AP_STAT_POST_UPLOAD;
                    Serial.println("stats=UPL_AP_STAT_POST_UPLOAD");
                }
                if (stat == UPL_AP_STAT_POST_UPLOAD && currentLine.endsWith("Content-Type: multipart/form-data; boundary="))
                {
                    stat = UPL_AP_STAT_POST_START_BOUNDRY;
                    Serial.println("stats=UPL_AP_STAT_POST_START_BOUNDRY");
                }
                if (stat == UPL_AP_STAT_POST_UPLOAD && currentLine.endsWith("Content-Type: image/"))
                {
                    stat = UPL_AP_STAT_POST_START_IMAGE;
                    Serial.println("stats=UPL_AP_STAT_POST_START_IMAGE");
                }
                if (stat == UPL_AP_STAT_POST_UPLOAD && boundpos > 0 && currentLine.endsWith(boundbuf))
                {
                    Serial.println("found boundry");
                }
                if (stat == UPL_AP_STAT_POST_GET_IMAGE && boundpos > 0 && currentLine.endsWith(boundbuf))
                {
                    Serial.println("found image boundry");
                    Serial.println(imagepos);
                    stat = UPL_AP_STAT_POST_UPLOAD;
                    imagepos = imagepos - boundpos - 3;
#ifdef IMAGE_DEBUG
                    Serial.println(imagepos);
                    for (int i = 0; i < imagepos; i++)
                    {
                        Serial.write(imagebuf[i]);
                    }
#endif
                    Serial.println("stats=UPL_AP_STAT_POST_UPLOAD");
                }
            }
            else
            {
                if (stat == UPL_AP_STAT_MAIN)
                {
                    printUploadForm(client);
                    break;
                }
                if (stat == UPL_AP_STAT_POST_UPLOAD)
                {
                    printThanks(client);
                    break;
                }
                if (stat == UPL_AP_STAT_GET_IMAGE)
                {
                    printImage(client);
                    break;
                }

                Serial.println("stat unknown");
                delay(1000);
                break;
            }
        }
        // close the connection:
        client.stop();
        Serial.println("client disonnected");
    }

    delay(100);
}

/*====================================================================================
  This sketch contains support functions to render the Jpeg images.
  Created by Bodmer 15th Jan 2017
  ==================================================================================*/

// Return the minimum of two values a and b
#define minimum(a, b) (((a) < (b)) ? (a) : (b))

//====================================================================================
//   This function opens the Filing System Jpeg image file and primes the decoder
//====================================================================================
void drawArrayJpeg(uint8_t *buff_array, uint32_t buf_size, int xpos, int ypos)
{

    Serial.println("=====================================");
    Serial.println("Drawing Array ");
    Serial.println("=====================================");

    boolean decoded = JpegDec.decodeArray(buff_array, buf_size);
    if (decoded)
    {
        // print information about the image to the serial port
        jpegInfo();

        // render the image onto the screen at given coordinates
        jpegRender(xpos, ypos);
    }
    else
    {
        Serial.println("Jpeg file format not supported!");
    }
}

//====================================================================================
//   Decode and paint onto the TFT screen
//====================================================================================
void jpegRender(int xpos, int ypos)
{

    // retrieve infomration about the image
    uint16_t *pImg;
    uint16_t mcu_w = JpegDec.MCUWidth;
    uint16_t mcu_h = JpegDec.MCUHeight;
    uint32_t max_x = JpegDec.width;
    uint32_t max_y = JpegDec.height;

    // Jpeg images are draw as a set of image block (tiles) called Minimum Coding Units (MCUs)
    // Typically these MCUs are 16x16 pixel blocks
    // Determine the width and height of the right and bottom edge image blocks
    uint32_t min_w = minimum(mcu_w, max_x % mcu_w);
    uint32_t min_h = minimum(mcu_h, max_y % mcu_h);

    // save the current image block size
    uint32_t win_w = mcu_w;
    uint32_t win_h = mcu_h;

    // record the current time so we can measure how long it takes to draw an image
    uint32_t drawTime = millis();

    // save the coordinate of the right and bottom edges to assist image cropping
    // to the screen size
    max_x += xpos;
    max_y += ypos;

    // read each MCU block until there are no more
    while (JpegDec.read())
    {

        // save a pointer to the image block
        pImg = JpegDec.pImage;

        // calculate where the image block should be drawn on the screen
        int mcu_x = JpegDec.MCUx * mcu_w + xpos;
        int mcu_y = JpegDec.MCUy * mcu_h + ypos;

        // check if the image block size needs to be changed for the right edge
        if (mcu_x + mcu_w <= max_x)
            win_w = mcu_w;
        else
            win_w = min_w;

        // check if the image block size needs to be changed for the bottom edge
        if (mcu_y + mcu_h <= max_y)
            win_h = mcu_h;
        else
            win_h = min_h;

        // copy pixels into a contiguous block
        if (win_w != mcu_w)
        {
            for (int h = 1; h < win_h - 1; h++)
            {
                memcpy(pImg + h * win_w, pImg + (h + 1) * mcu_w, win_w << 1);
            }
        }

        // draw image MCU block only if it will fit on the screen
        if ((mcu_x + win_w) <= tft.width() && (mcu_y + win_h) <= tft.height())
        {
            tft.drawRGBBitmap(mcu_x, mcu_y, pImg, win_w, win_h);
        }

        // Stop drawing blocks if the bottom of the screen has been reached,
        // the abort function will close the file
        else if ((mcu_y + win_h) >= tft.height())
            JpegDec.abort();
    }

    // calculate how long it took to draw the image
    drawTime = millis() - drawTime;

    // print the results to the serial port
    Serial.print("Total render time was    : ");
    Serial.print(drawTime);
    Serial.println(" ms");
    Serial.println("=====================================");
}

//====================================================================================
//   Send time taken to Serial port
//====================================================================================
void jpegInfo()
{
    Serial.println(F("==============="));
    Serial.println(F("JPEG image info"));
    Serial.println(F("==============="));
    Serial.print(F("Width      :"));
    Serial.println(JpegDec.width);
    Serial.print(F("Height     :"));
    Serial.println(JpegDec.height);
    Serial.print(F("Components :"));
    Serial.println(JpegDec.comps);
    Serial.print(F("MCU / row  :"));
    Serial.println(JpegDec.MCUSPerRow);
    Serial.print(F("MCU / col  :"));
    Serial.println(JpegDec.MCUSPerCol);
    Serial.print(F("Scan type  :"));
    Serial.println(JpegDec.scanType);
    Serial.print(F("MCU width  :"));
    Serial.println(JpegDec.MCUWidth);
    Serial.print(F("MCU height :"));
    Serial.println(JpegDec.MCUHeight);
    Serial.println(F("==============="));
}

//====================================================================================
//   Open a Jpeg file and dump it to the Serial port as a C array
//====================================================================================
void createArray(const char *filename)
{

    fs::File jpgFile; // File handle reference for SPIFFS
    //  File jpgFile;  // File handle reference For SD library

    if (!(jpgFile = SPIFFS.open(filename, "r")))
    {
        Serial.println(F("JPEG file not found"));
        return;
    }

    uint8_t data;
    byte line_len = 0;
    Serial.println("// Generated by a JPEGDecoder library example sketch:");
    Serial.println("// https://github.com/Bodmer/JPEGDecoder");
    Serial.println("");
    Serial.println("#if defined(__AVR__)");
    Serial.println("  #include <avr/pgmspace.h>");
    Serial.println("#endif");
    Serial.println("");
    Serial.print("const uint8_t ");
    while (*filename != '.')
        Serial.print(*filename++);
    Serial.println("[] PROGMEM = {"); // PROGMEM added for AVR processors, it is ignored by Due

    while (jpgFile.available())
    {

        data = jpgFile.read();
        Serial.print("0x");
        if (abs(data) < 16)
            Serial.print("0");
        Serial.print(data, HEX);
        Serial.print(","); // Add value and comma
        line_len++;
        if (line_len >= 32)
        {
            line_len = 0;
            Serial.println();
        }
    }

    Serial.println("};\r\n");
    // jpgFile.seek( 0, SeekEnd);
    jpgFile.close();
}
//====================================================================================


Seeeduino XIAO with TNT 240x240 ST7789 Display

SeeeduinoXIAOでWebカメラの 雲台のサーボ2台とジョイスティック と2色LED


SeeeduinoXIAOでWebカメラの
雲台のサーボ2台とジョイスティック
と2色LEDをコントロールしてます。
ジョイスティックの押し ボタンで3個のモード切替
ジョイスティック操作モード、再現モード、プログラムモード
Seeeduino XIAO
で3個のRGBLEDをチカチカもしてみました。内部LEDも使えます。
aruduino スケッチ
//LEDECO.com/ Shinji Tsuda
//2020.10.24
#include
#include
int joyX = 5;
int joyY = 6;
int servoVal;
int b_pin = 3; // デジタルデータ出力用ピン番号
int value = 0; // ピンより取得したデータ格納用
int led1 = 7; // 1つ目のLEDのピン番号
int led2 = 8; // 2つ目のLEDのピン番号
int s = 0;
int i = 0;
int j = 0;
int x[100];
int y[100];
Servo myservo1;
Servo myservo2;
void setup() {
Serial.begin(115200);
pinMode(b_pin, INPUT_PULLUP); // ボタンスイッチを入力に設定
pinMode(led1, OUTPUT); // 1つ目のLEDを出力に設定
pinMode(led2, OUTPUT); // 2つ目のLEDを出力に設定
Serial.println("seeeduinoXIAO Servo test!");
myservo1.attach(0);
myservo2.attach(1);
pinMode(LED_BUILTIN, OUTPUT);
myservo1.write(90);
delay(200);
myservo2.write(90);
delay(200);

}

void loop() {
digitalWrite(LED_BUILTIN, HIGH);
Serial.print("LEDeco.com,shinji:");
digitalWrite(PIN_LED3, LOW);
digitalWrite(PIN_LED2, HIGH);
delay(100);
s = 0; for (int i = 0;; i++) { //繰り返しの設定
delay(100); //チャタリング防止
if (digitalRead(3) == LOW) { //タクトスイッチが押されたことを検知
s = s + 1; //状態を進める
if (s > 2) //3水準なので0,1,2の次は0
s = 0;
delay(20);
if (i > 30) //繰り返し動作の状態の確認
i = 0;
delay(20);

while (digitalRead(3) == LOW) {} //タクトスイッチが押されたことを検知
}
if (s == 0) { //第一の状態

digitalWrite(7, HIGH);
digitalWrite(8, LOW );

servoVal = analogRead(joyX);
servoVal = map(servoVal, 0, 1023, 70, 130);
myservo1.write(servoVal);
Serial.println("joyX");
x[j] = servoVal;
Serial.println(servoVal); // 値をシリアルモニタに表示
delay(100);

servoVal = analogRead(joyY);
servoVal = map(servoVal, 0, 1023, 30, 150);
myservo2.write(servoVal);
Serial.println("joyY");
y[j] = servoVal;
Serial.println(servoVal); // 値をシリアルモニタに表示
delay(100);
j = j+1;
if (j > 99){ //繰り返し動作の状態の確認
j = 0; s = s + 1;
}
delay(20);}

if (s == 1) { //第二の状態

digitalWrite(7, LOW);
digitalWrite(8, HIGH ); delay(50);
myservo1.write(x[j]);
delay(100);
Serial.println("joyXcopy");Serial.println(x[j]);
myservo2.write(y[j]);
delay(100);
Serial.println("joyXcopy");Serial.println(y[j]);
j = j+1;
if (j > 99){ //繰り返し動作の状態の確認
j = 0; s = 0;
}
delay(20);}

if (s == 2) { // 第三の状態
digitalWrite(7, HIGH);
digitalWrite(8, HIGH );
delay(50);
for ( int i = 90 ; i <=120; i++ ){
myservo1.write(i);delay(10);}
delay(1000);
for ( int i = 90 ; i <=110; i++ ){
myservo2.write(i);delay(10);}
delay(1000);
for ( int i = 110 ; i <=130; i++ ){
myservo2.write(i);delay(10);}
delay(1000);
for ( int i = 130 ; i >=110; i-- ){
myservo2.write(i);delay(10);}
delay(1000);
for ( int i = 110 ; i >=90; i-- ){
myservo2.write(i);delay(10);}
delay(1000);
for ( int i = 120 ; i <=150; i++ ){
myservo1.write(i);delay(10);}
delay(1000);
for ( int i = 80 ; i <=110; i++ ){
myservo2.write(i);delay(10);}
delay(1000);
for ( int i = 110 ; i <=130; i++ ){
myservo2.write(i);delay(10);}
delay(1000);
for ( int i = 130 ; i >=110; i-- ){
myservo2.write(i);delay(10);}
delay(1000);
for ( int i = 110 ; i >=90; i-- ){
myservo2.write(i);delay(10);}
delay(1000);
for ( int i = 150 ; i >=120; i-- ){
myservo1.write(i);delay(10);}
delay(1000);
for ( int i = 90 ; i <=110; i++ ){
myservo2.write(i);delay(10);}
delay(1000);
for ( int i = 110 ; i <=130; i++ ){
myservo2.write(i);delay(10);}
delay(1000);
for ( int i = 130 ; i >=110; i-- ){
myservo2.write(i);delay(10);}
delay(1000);
for ( int i = 110 ; i >=90; i-- ){
myservo2.write(i);delay(10);}
delay(1000);
for ( int i = 120 ; i >=90; i-- ){
myservo1.write(i);delay(10);}
digitalWrite(PIN_LED2, HIGH);
digitalWrite(PIN_LED3, LOW);
delay(1000);
for ( int i = 90 ; i <=110; i++ ){
myservo2.write(i);delay(10);}
delay(1000);
for ( int i = 110 ; i <=130; i++ ){
myservo2.write(i);delay(10);}
delay(1000);
for ( int i = 130 ; i >=110; i-- ){
myservo2.write(i);delay(10);}
delay(1000);
for ( int i = 110 ; i >=80; i-- ){
myservo1.write(i);delay(10);}
delay(1000);
for ( int i = 110 ; i <=130; i++ ){
myservo2.write(i);delay(10);}
delay(1000);
for ( int i = 130 ; i >=110; i-- ){
myservo2.write(i);delay(10);}
delay(1000);
for ( int i = 110 ; i >=90; i-- ){
myservo2.write(i);delay(10);}
delay(1000);

}
}
}

湿温度時計 Arduino pro mini


Arduino UNO  Arduino pro mini  1602  LCD   I2C  
 DS1307 RTC クロックモジュール   DHT11 湿度センサー温度センサー
を使って湿温度時計を製作しました。前に作った8x8x8LEDキューブ
に取り付けて実用してます。


Arduino スケッチ

//LEDECO.com //Shinji Tsuda
//2020.010.15
#include <Wire.h>
#include <LiquidCrystal_I2C.h>
#include "RTClib.h"
#include <DHT.h>
LiquidCrystal_I2C lcd(0x27, 16, 2); // set the LCD address to 0x27 for a 16 chars and 2 line display
RTC_DS1307 RTC;
const int PIN_DHT = 8;
DHT dht(PIN_DHT, DHT11);

void setup()
{
  lcd.init();                      // initialize the lcd

  // Print a message to the LCD.
  lcd.backlight();
  lcd.setCursor(0, 0);
  lcd.print("Hello, world!");
  lcd.setCursor(0, 1);
  lcd.print("Arduino!");
  delay(1000);
  lcd.setCursor(0, 0);
  lcd.print("  LEDeco.com  ");
  lcd.setCursor(0, 1);
  lcd.print(" Shinji,TSUDA ");
  delay(1000);
  Serial.begin(9600);
  dht.begin();
  Wire.begin();
  RTC.begin();
  if (! RTC.isrunning()) {
    Serial.println("RTC is NOT running!");
    // following line sets the RTC to the date & time this sketch was compiled

  }
  RTC.adjust(DateTime(__DATE__, __TIME__));
}

void loop()
{ // set the cursor to column 0, line 1
  // (note: line 1 is the second row, since counting begins with 0):
  // print the number of seconds since reset:
  //lcd.print(millis() / 1000);

  delay(100);

  float humidity = dht.readHumidity();
  float temperature = dht.readTemperature();

  Serial.print("Humidity:  ");
  Serial.print(humidity);
  Serial.println("%\t");
  Serial.print("Temperature:  ");
  Serial.print(temperature);
  Serial.println(" *C");
  DateTime now = RTC.now();
  Serial.print(now.year(), DEC);
  Serial.print('/');
  Serial.print(now.month(), DEC);
  Serial.print('/');
  Serial.print(now.day(), DEC);
  Serial.print(' ');
  Serial.print(now.hour(), DEC);
  Serial.print(':');
  Serial.print(now.minute(), DEC);
  Serial.print(':');
  Serial.print(now.second(), DEC);
  Serial.println();
  delay(1500);
  lcd.setCursor(0, 0);
  lcd.print("Ondo   : " + String(temperature) + "*C");
  lcd.setCursor(0, 1);
  lcd.print("Sitsudo: " + String(humidity) + "%");
  delay(1500);
  lcd.setCursor(0, 0);
  lcd.print("Temp   : " + String(temperature) + "*C");
  lcd.setCursor(0, 1);
  lcd.print("Humid  : " + String(humidity) + "%");
  delay(1500);
  lcd.setCursor(0, 0);
  lcd.print(" DAY :");
  lcd.print(now.year(), DEC);
  lcd.print('/');
  lcd.print(now.month(), DEC);
  lcd.print('/');
  lcd.print(now.day(), DEC);
  lcd.print(' '); lcd.print(' ');
  lcd.setCursor(0, 1);
  lcd.print(" TIME:  ");
  lcd.print(now.hour(), DEC);
  lcd.print(':');
  lcd.print(now.minute(), DEC);
  lcd.print(':');
  lcd.print(now.second(), DEC);
  lcd.print(' '); lcd.print(' ');
  lcd.print(' '); lcd.print(' ');
  delay(1500);
  lcd.setCursor(0, 0);
  lcd.print("HINITI");
  lcd.print(now.year(), DEC);
  lcd.print('/');
  lcd.print(now.month(), DEC);
  lcd.print('/');
  lcd.print(now.day(), DEC);
  lcd.print(' '); lcd.print(' ');
  lcd.setCursor(0, 1);
  lcd.print("JIKAN  ");
  lcd.print(now.hour(), DEC);
  lcd.print(':');
  lcd.print(now.minute(), DEC);
  lcd.print(':');
  lcd.print(now.second(), DEC);
  lcd.print(' '); lcd.print(' ');
  lcd.print(' '); lcd.print(' ');
  delay(1500);
}


Arduino pro mini でLチカナイトライダー回路

Seeeduino XIAO-Arduino Lチカ ナイトライダー

Seeeduino XIAO-Arduinoを始めました、スエドイノシャオと言うらしい。 Lチカの定番 ナイトライダー回路を組んでみました。


Seeeduino XIAO-Arduino

ナイトライダー回路のスケッチ

#define LED_0 0
#define LED_1 1
#define LED_2 2
#define LED_3 3
#define LED_4 4

#define LED_6 6
#define LED_7 7
#define LED_8 8
#define LED_9 9
void setup() {
  pinMode(LED_BUILTIN, OUTPUT); 
  pinMode(LED_0, OUTPUT);
  pinMode(LED_1, OUTPUT);
  pinMode(LED_2, OUTPUT);
  pinMode(LED_3, OUTPUT);
  pinMode(LED_4, OUTPUT);
 
  pinMode(LED_6, OUTPUT);
  pinMode(LED_7, OUTPUT);
  pinMode(LED_8, OUTPUT); 
  pinMode(LED_9, OUTPUT);
}

void loop() {
  // LED Off
  digitalWrite(LED_BUILTIN, HIGH);
  digitalWrite(LED_0, LOW); 
  digitalWrite(LED_1, LOW);  
  digitalWrite(LED_2, LOW);
  digitalWrite(LED_3, LOW); 
  digitalWrite(LED_4, LOW);  
  digitalWrite(LED_6, LOW);
  digitalWrite(LED_7, LOW); 
  digitalWrite(LED_8, LOW);  
  digitalWrite(LED_9, LOW);
  delay(300);
  // LED On
  digitalWrite(LED_BUILTIN, LOW);
  digitalWrite(LED_0, HIGH);
  delay(300);
  digitalWrite(LED_1, HIGH);
  delay(300);
  digitalWrite(LED_2, HIGH);
  delay(300);
  digitalWrite(LED_3, HIGH);
  delay(300);
  digitalWrite(LED_4, HIGH);
  delay(300);
  digitalWrite(LED_6, HIGH);
  delay(300);
  digitalWrite(LED_7, HIGH);
  delay(300);
  digitalWrite(LED_8, HIGH);
  delay(300);
  digitalWrite(LED_9, HIGH);
  delay(300);
  digitalWrite(LED_0, LOW); 
  digitalWrite(LED_1, LOW);  
  digitalWrite(LED_2, LOW);
  digitalWrite(LED_3, LOW); 
  digitalWrite(LED_4, LOW);  
  digitalWrite(LED_6, LOW);
  digitalWrite(LED_7, LOW); 
  digitalWrite(LED_8, LOW);  
  digitalWrite(LED_9, LOW);
  delay(100);
  digitalWrite(LED_9, HIGH);
  delay(300);
  digitalWrite(LED_8, HIGH);
  delay(300);
  digitalWrite(LED_7, HIGH);
  delay(300);
  digitalWrite(LED_6, HIGH);
  delay(300);
  digitalWrite(LED_4, HIGH);
  delay(300);
  digitalWrite(LED_3, HIGH);
  delay(300);
  digitalWrite(LED_2, HIGH);
  delay(300);
  digitalWrite(LED_1, HIGH);
  delay(300);
  digitalWrite(LED_0, HIGH);
  delay(300);
for (int i = 0; i < 20; i++) { 
    digitalWrite(0, HIGH);     
    delay(80);       
    digitalWrite(1, HIGH);     
    delay(80);
    digitalWrite(2, HIGH);     
    delay(80);       
    digitalWrite(3, HIGH);     
    delay(80);                          
    digitalWrite(0, LOW);     
    delay(80);  
    digitalWrite(4, HIGH);     
    delay(80);                          
    digitalWrite(1, LOW);     
    delay(80);  
    digitalWrite(6, HIGH);     
    delay(80);                          
    digitalWrite(2, LOW);     
    delay(80);  
    digitalWrite(7, HIGH);     
    delay(80);                          
    digitalWrite(3, LOW);     
    delay(80);     
    digitalWrite(8, HIGH);     
    delay(80);                          
    digitalWrite(4, LOW);     
    delay(80);   
    digitalWrite(9, HIGH);     
    delay(80);                          
    digitalWrite(6, LOW);     
    delay(80);   
    digitalWrite(7, LOW);     
    delay(80);  
    digitalWrite(8, LOW);     
    delay(80);   
    digitalWrite(9, LOW);     
    delay(80);   
 
    digitalWrite(9, HIGH);     
    delay(80);       
    digitalWrite(8, HIGH);     
    delay(80);
    digitalWrite(7, HIGH);     
    delay(80);       
    digitalWrite(6, HIGH);     
    delay(80);                          
    digitalWrite(9, LOW);     
    delay(80);  
    digitalWrite(4, HIGH);     
    delay(80);                          
    digitalWrite(8, LOW);     
    delay(80);  
    digitalWrite(3, HIGH);     
    delay(80);                          
    digitalWrite(7, LOW);     
    delay(80);  
    digitalWrite(2, HIGH);     
    delay(80);                          
    digitalWrite(6, LOW);     
    delay(80);     
    digitalWrite(1, HIGH);     
    delay(80);                          
    digitalWrite(4, LOW);     
    delay(80);   
    digitalWrite(0, HIGH);     
    delay(80);                          
    digitalWrite(3, LOW);     
    delay(80);   
    digitalWrite(2, LOW);     
    delay(80);  
    digitalWrite(1, LOW);     
    delay(80);   
    digitalWrite(0, LOW);     
    delay(80);   
                        
  }


}
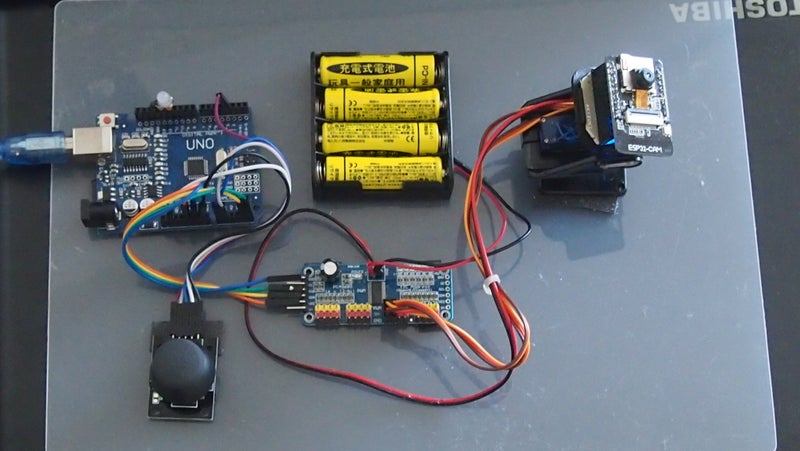


Arduino ジョイスティック を使ってWiFi   ESP32-S カメラモジュールを操作


ESP32 ESP32-S カメラモジュール  WiFi  

Arduino UNO R3

SG90サーボ用 2軸 カメラマウント 2軸アングル FPV

PCA9685 16チャンネル 12-ビット PWM Servo モーター ドライバー IIC モジュール

Dual-axis Joystick ジョイスティック モジュール

これらを使って、スマホで見れる自宅の内部を監視システムを作っています。


ジョイスティックのプッシュボタンで3コースのパターンの動きにしてます。

1、LED表示がグりーン プログラムされたカメラの動きパターン

2、LED表示がレッド ジョイスティックの操作のカメラの動き、動きが荒いね。

3、LED表示がオレンジ ジョイスティックの操作のカメラの動きを記憶。1で再現

3は未完成。EEPROMの使い方を勉強してから。

LEDは、赤、緑の2色LEDを使用。


Arduino 自宅監視 WIFI Camera WEB Saver robot 製作

自動アルコール消毒材散布機の製作。アルディーpro mini

自動アルコール消毒材散布機の製作。アルディーpro mini


前に作ったオート、キレイキレイ、ビオレを改良しました。


センサーを超音波センサからシャープ近接センサに変えてアルディーノminiからアルディーノpro mini

に変えて小型化耐水防水化いてます。

アルディーノスケッチ

//LEDECO.com
//2020.10.05
//赤外線距離センサー SHARP GP2Y0A21
const int PIN_ANALOG_INPUT = 3;  // アナログピン3番のセンサーの値を読込む
#include <Servo.h>
Servo myservo1;
Servo myservo2;
void setup() {
 Serial.begin(9600);
   pinMode(5,OUTPUT);
   pinMode(6,OUTPUT);  
  myservo1.attach(8);
  myservo2.attach(9);
  delay(1000);
  myservo1.write(0);
  myservo2.write(0); 
  delay(1000);        
   }
void loop() {
     int i = analogRead( PIN_ANALOG_INPUT );
   if ((i) > 450){
        digitalWrite(6,HIGH);
        digitalWrite(5,HIGH);
        delay(100);   
        myservo1.write(150);
        myservo2.write(150); 
        delay(1000); 
        myservo1.write(0);
        myservo2.write(0); 
        delay(1000);        
       
        }
  if ((i) > 350) {
        digitalWrite(5,HIGH); 
        digitalWrite(6,LOW);  
        delay(100); 
       
        }  
   if ((i) > 250){     
        digitalWrite(5,LOW);
        digitalWrite(6,HIGH);
        delay(100);  
        }       
  else{
       digitalWrite(5,LOW);
       digitalWrite(6,LOW); 
       delay(100); 
}
}

6軸菓子盗りロボット試運転