
The roof drainage system is a complex of elements that ensures the organized collection and drainage of rainwater and meltwater from the roof. Without a high-quality drainage system, water flows chaotically, which leads to damage to the facade, foundation, flooding of the basement and the formation of ice on the eaves. A properly designed and installed system extends the life of the house, protects against soil erosion around the foundation and improves the aesthetic appearance of the building. In modern construction, gutters are a mandatory element. They allow you to effectively manage water flows even during heavy downpours. In this comprehensive guide, we cover system types, materials, calculation, installation, maintenance and common mistakes.

Types of drainage systems
External and internal drains
External gutters are the most common for private houses with pitched roofs. They are mounted along the perimeter of the cornice. Indoor systems are used mainly on flat roofs of multi-story buildings or shopping centers. Water is collected in watering cans inside the roof and piped inside the house.
Sectional and seamless systems
Sectional systems consist of ready-made sections of gutters that are connected to each other. They are cheaper and easier to install. Seamless (one-piece) systems are manufactured directly on site using special equipment - this reduces the number of joints and the risk of leaks.
Materials for drainage systems
The choice of material depends on the budget, climate, architectural style and expected service life.
Plastic (PVC) gutters
Plastic systems are light, corrosion resistant, inexpensive and easy to install. They withstand temperature changes well, but can become brittle in severe frost and fade in the sun. The service life is 10–15 years. An ideal option for budget construction.
Metal gutters
- Galvanized steel: affordable price, high strength. It needs a protective coating (polymer), otherwise it rusts quickly.
- Aluminum: light, not subject to corrosion, durable. Well suited for regions with high humidity.
- Copper: premium material. Over time, it becomes covered with patina, it looks impressive. The service life is more than 50 years. High cost.
- Titanium zinc: ecological, very durable, but expensive.
Metal systems better withstand mechanical loads, but need high-quality anti-corrosion protection.
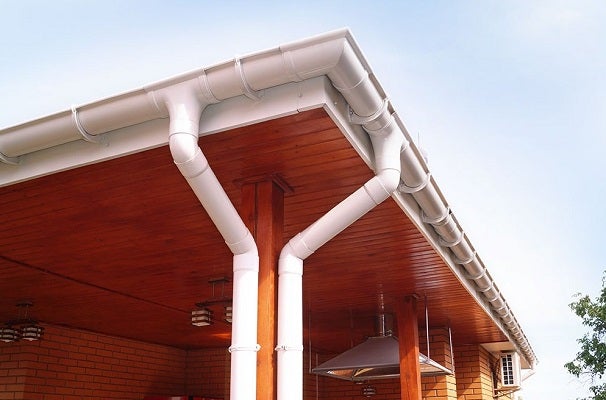
The main elements of the drainage system
The drainage system consists of the following components:
- Gutters (gutters) - horizontal channels for collecting water.
- Drain pipes - vertical elements for draining water down.
- Watering cans (funnels) - connect the gutter with the pipe.
- Brackets (holders) - fastening gutters to the roof.
- Plugs - close the ends of the gutters.
- Knees, tees, adapters - to change the direction of pipes.
- Protective nets - prevent clogging by leaves.
Additional elements: drain knees, wells, gutter heating systems in cold climates.
Calculation of the drainage system
Correct calculation is the key to effective work. Basic parameters:
Determination of effective roof area
The effective area is the projection of slopes on a horizontal surface. For one gutter, the area should not exceed 50–100 m², depending on the diameter. For a standard system of 125/90 mm up to 80–100 m².
Diameter of gutters and pipes
- For small roofs: gutter 100–125 mm, pipe 75–90 mm.
- For large ones: gutter 150 mm and more, pipe 100–120 mm.
The number of pipes and slope
For every 10-12 meters, there is a gutter, one drainage pipe. The slope of the gutter is 2–5 mm per 1 meter in the direction of the watering can. This ensures a quick flow of water without stagnation.
Use online calculators of manufacturers (for example, Rainway, Grand Line, TechnoNICOL) for an accurate calculation. Consider regional rainfall patterns.

Installation of the drainage system: step-by-step instructions
Installation can be done independently, but it is better to involve specialists for complex roofs.
Preparation of tools and materials
Needed: drill, screwdriver, hacksaw, level, tape measure, ladder, sealant, self-tapping screws.
Stages of installation
- Marking and installation of brackets. Install the holders with a step of 50-60 cm. Provide the required slope.
- Installation of gutters. Insert the gutters into the brackets, connect the sections with sealant or couplings.
- Installation of watering cans and plugs.
- Installation of drainage pipes. Use your knees to go around the cornice. Fasten the pipes to the wall with clamps every 1.5-2 meters.
- Connection to drainage. Drain the water into a downspout or downspout.
Important: installation should be performed at a temperature above +5°C for plastic. Do not fasten the gutters directly to the rafters without a crate.
Maintenance and care
Regular maintenance extends the service life:
- Clean gutters of leaves and debris 2-4 times a year.
- Check fasteners and tightness.
- In winter, use anti-icing systems (heating cables).
- Conduct a visual inspection after strong storms.
Common errors and problems
- Incorrect slope - water stagnates.
- Insufficient number of tubes - transfusion.
- Bad fastening - deformation from snow.
- Ignoring the waterproofing of joints.
Solution: use high-quality components and follow the manufacturer's recommendations.

Modern solutions and innovations
Today, systems with heating, intelligent control, hidden (integrated into the eaves) gutters are popular. Ecological materials and rainwater collection systems for watering the garden are becoming a trend.
Conclusion
A high-quality gutter system is an investment in the longevity of the house. The correct choice of materials, accurate calculation and professional installation guarantee reliable protection against water. Do not skimp on this important element: it is better to do well once than to constantly repair the consequences.