10 Finest Portrait Lights Patterns
Light can make or break a picture. But the bright side is that you do not require to get a lot of costly and also fancy lighting equipment. You can develop incredible portrait illumination patterns with one single light!
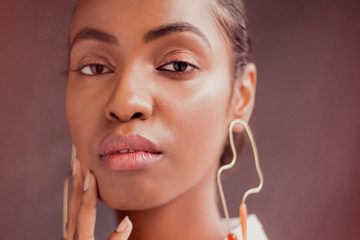
A white and black portrait of a girl
Picture by Kreated Media on Unsplash
[ Keep in mind: ExpertPhotography is sustained by visitors. Item web links on ExpertPhotography are recommendation links. We make a little bit of money if you utilize one of these and purchase something. Required more details? See exactly how everything works here.]
What You Required for Minimalist Portrait Lights
Besides the electronic camera, you need:
A speedlight (a strobe or video light works also);.
Off-camera radio transmitter;.
A tripod or light stand with a flash bracket to hold the light;.
A diffuser to soften the light;.
A reflector.
It's very easy to spend a ton of money on lighting gear. The picture illumination gear we used just set you back a couple of hundred bucks (excluding the video camera and lens).
You can also escape much less by getting a used flash and also spending plan brand name gear.
A close up portrait of a young woman in glasses.
Photo by Victor Miyata.
One Light Picture Lighting Patterns.

1. Diffused On-Camera Flash.
The Look.
A straightforward diffused on-camera flash functions as a fill light. It removes under-eye darkness and also includes a shimmer to the eye.
The light is originating from the exact same instructions as the camera. This implies that there are couple of darkness. If you soften the light, these can flatter imperfections like bumps and also wrinkles in the skin.
This illumination pattern is the least intriguing of the bunch. But when the lights in the scene is already fascinating, you can perfect the portrait with a mild fill utilizing this strategy.
The Setup.
Leave the flash on your video camera, however add a diffuser. Turn the flash to hands-on mode as well as dial it down. I often utilize this technique on the lowest possible flash setup.
When to Utilize It.
If the sunlight is already developing superb lights for portraits, a diffused on-camera flash can include one crucial information: catchlights.
Catchlight is the source of light mirrored in the topic's eye. If you were to zoom into the version's eye, you would certainly be able to detect the shape of the light source. Catchlight adds measurement to the picture and also attracts the audience's attention to the eyes. Without the catchlight, the topic's eye seems dull and lacks the shimmer that makes it look alive.
On-camera flash doesn't add much dimension. This is because the light is originating from the same angle as the video camera.
When a window or the sunlight is currently adding that measurement, use it. If you only require a catchlight, there's nothing wrong with appearing a little on-camera flash.
2. Jumped On-Camera Flash.

The Appearance.
Soft picture light that strikes the topic from an angle.
The Configuration.
Leave the flash on your video camera. Place a reflector, so it bounces the light back to your topic. Transform the flash head up until it directs right into the reflector.
With this arrangement, you can change the reflector to obtain different looks. Attempt jumping right into a reflector that's angled 45 degrees in front of the subject.
Or, aim the flash head up as well as have somebody angle the reflector over your head. This creates a look similar to butterfly illumination with an off-camera flash.
You don't need to make use of a reflector either. You can bounce your light off a neutral coloured wall or ceiling.
When to Utilize It.
You may not have a radio transmitter to obtain your flash off the cam. This method will certainly permit you to obtain soft, tilted light in your portraits without one.
The drawback is that holding the reflector in the best setting is challenging by yourself.
You can obtain a place to hold the reflector on a tripod. These are hard to angle right as well as often tend to tip over in the wind.
Still, the light is flattering. And it's an outstanding tipping stone into off-camera illumination.
3. Butterfly Lights.
The Appearance.
A soft light that hits the subject from above. It develops a tiny darkness underneath the nose as well as chin. These shadows aid to make the topic's face slimmer. The form of the darkness under the nose appears like a butterfly, thus the name. This lights brightens up both eyes as well as both sides of the face equally.
The Configuration.
Put an off-camera light directly behind the electronic camera. But, unlike an on-camera flash, climb the light stand, so the light is above the topic's head.
After that, angle the light down in the direction of the topics deal with at regarding a 45-degree angle.
When to Utilize It.
Butterfly lighting is a simple yet prominent lights method. This picture illumination configuration can highlight the jawline and the cheekbones.
Try adjusting the modifiers from soft to hard. This allows for even more variants from flattering and also simple to remarkable.
The light is flattering to different skin types. It prevails for charm photography along with imitating a 1950s style beauty shot. It's likewise a complementary lighting configuration for elderly topics as it does not emphasize the wrinkles that much.
A white and black picture of Marilyn Monroe.
Notification the butterfly-shaped darkness below the nose.
4. Clamshell Illumination.
The Look.
This lighting pattern makes use of light that hits the topic from above. Yet it fills in the shadows for an even softer light.
The appearance is identified by two catchlights and also a soft darkness listed below the chin. This lights pattern additionally exaggerates the cheekbones and also jawline.
The Setup.
Establish a butterfly light with the flash over and also behind the camera, however angled down regarding 45 levels.
Include a reflector placed in the subject's lap. Ask to hold it in place. The reflector will bounce a few of that light back up as a fill light.
When to Utilize It.
This soft, complementary light is common in beauty shots as well as pictures of women. The shadows on the cheekbones can slim the face and define the jawline.
While it's a appeal light, that doesn't suggest this can't be utilized with guys. Picture photographers making use of clamshell light on guys tend to add harsher shadows by relocating the light further from the face.
A close portrait of a beautiful blonde lady.
Picture by Amir Seilsepour.
5. Loophole Lights.
The Look.
A majority of the face is still well lit. You're working with a crucial light that's off to the side of the video camera. This includes darkness away of the face.
The light is conveniently recognizable by a brief darkness that's on one edge of the nose. It's not under, however not specifically to the side either.
The Arrangement.
A loophole light is a butterfly light however moved to one side of the subject. Put an off-camera light alongside the video camera and also off sideways, approximately a 45-degree angle from the topic.
The light ought to also be taller than the subject but angled down at them.
The light must be much sufficient from the electronic camera to produce shadows on one side of the face. Maintain it close enough to the video camera that both sides of the face are well lit.
When to Utilize It.
If you want the lovely light of Brand Photographer a butterfly, yet with more interest and also dimension, try loophole illumination.
This pattern is a middle ground in between super soft beauty lights as well as remarkable and also dark .
Incentive Variation.
Make use of a reflector opposite of the light to lighten the darkness.
A black and white portrait of young Elizabeth Taylor.
6. One Light Rembrandt.
The Appearance.
You can identify Rembrandt light by a triangular of light under one eye. The triangle-shaped light gets on the cheek farthest from the light. The lights arrangement got its name after the famous Dutch painter, Rembrandt. His paintings commonly display this kind of lighting.
The Rembrandt lights pattern additionally creates catchlights in both eyes.
The Configuration.
Move that loop lighting to a more severe angle. Rembrandt lighting is commonly a 45-degree learn this here now angle.
However you'll need to relocate the light till the contrary side of the face only has a small triangular of light on the cheek just below the eye. The height of the light is a foot or 2 over eye level.
Rembrandt illumination is often a two-light setup. To attain the style with a solitary light, utilize a reflector.
Like the main light, position the reflector at concerning a 45-degree angle from the subject, however on the contrary side. Make sure to angle the reflector to ensure that it's bouncing a few of that main light back.
When to Utilize It.
Rembrandt lighting is a typical yet significant lights design. This type of light is best for producing a extra significant portrait, not a soft smiling appeal shot. When firing male or masculine-looking designs, it's typically utilized.
The more extreme side angle is likewise less forgiving on skin textures. Acne as well as wrinkles can be a lot more noticeable in this style.
Rembrandt lights used in a picture of a woman.
Picture by Yuliya Kosolapova from Pexels.
7. Rim Illumination.
The Look.
Edge lights