Paint correction is the quiet craft behind a vehicle that looks truly flawless in daylight. It is not just gloss, it is the absence of swirls, haze, and oxidation that steal clarity from the finish. When correction gets paired properly with the right protection, the results last longer, maintenance becomes easier, and the vehicle keeps that crisp, wet look that catches your eye across a parking lot. This is true whether we are talking about a daily driver, a show car, or a 28 foot center console that spends weekends in salt spray.
I have corrected thousands of panels across automotive clear coats and marine gelcoats. The techniques overlap, but the chemistry, cure windows, and protection choices require judgment. You cannot simply compound, then throw on any wax, and call it good. Some combinations will mute the finish, others will not bond well, and a few will undo hours of polishing by filling defects that reappear after the first wash. The goal here is to explain the pairing logic, so the work you put into paint correction pays off month after month.
What paint correction actually fixes
Let us get specific. Correction removes or reduces defects in the top microns of the finish. On automotive clear coat, that is usually a polyurethane layer roughly 40 to 60 microns thick on modern cars, with total paint build around 100 to 140 microns. You correct swirls from poor washing, random isolated deep scratches, sanding marks from bodywork, etching from bird droppings, and water spot mineral deposits that grab the surface.
The work is an interplay of abrasives, pad density, machine movement, and heat. A good car detailing service will read the paint first. Harder German clear loves microfiber cutting pads and diminishing abrasives, while softer Japanese clear can haze easily and prefers foam and a gentler compound. On repainted panels, solvent sensitive clears may swell and gum. You pause, wipe with an isopropyl panel wipe, and reassess before chasing perfection that risks strike through.
Boat gelcoat is different. It is thicker, more porous, and oxidizes from UV at a faster rate. The chalky look you see on older hulls is oxidized gelcoat, not dirt. Aggressive compounding is often required, followed by refining passes to remove compounding haze. You can get a remarkable glow back, but the porosity means some protection products behave differently compared to automotive clear.
Sealants, waxes, and coatings in plain language
The words get thrown around, and they matter.
Carnauba waxes are natural or blended waxes that lay a sacrificial layer. The warmth and depth are real, especially on darker colors. They are forgiving, inexpensive, and pleasing to apply. They do not bond chemically, so longevity is measured in weeks to a couple of months in mild weather.
Synthetic sealants are polymer based. They form a tighter, more uniform film that resists detergents and UV better than wax. They have a slick, glassy look. Expect a few months up to half a year, depending on wash frequency, climate, and product.
Ceramic coatings, including those used in Boat ceramic coating, use silicon dioxide or similar chemistry that cures into a hard, crosslinked layer. On automotive finishes, a properly applied coating can deliver a year or several years of hydrophobics and chemical resistance. On gelcoat, the durability is strong, though the surface preparation and solvent tolerance become more critical.
Hybrid products blend waxes, polymers, and ceramic precursors to give quick application with better than wax performance. They are excellent for maintenance, but they cannot replace a true base layer if you want extended protection.
The finish you choose to install after correction is not just about how long it lasts. It affects the way the corrected paint reads in sunlight. Waxes add glow, sealants lean toward clarity, coatings lean toward crisp, hard reflectivity. None of these are wrong. You match them to the owner’s expectations, wash habits, and the environment the vehicle lives in.
Sequencing matters more than people think
After correction, the aim is to strip any fillers and residual oils before laying down a protection product. Most modern compounds finish down with lubricating oils that make the paint look perfect, but those oils can interfere with bond. Solvent based panel wipes, applied carefully, level the playing field.
Layering rules are simple, and breaking them is where results go sideways. A sealant can go on top of a coating only if the coating manufacturer allows it, but usually it is not necessary and may reduce self cleaning. A wax can sit on a sealant if you want to tweak the look, but not the other way around, because the wax would prevent the sealant from bonding. Topping a wax with anything synthetic typically wastes effort. If you want the durability and chemical resistance of a coating, put it on first, let it cure inside its window, then consider maintenance toppers later.
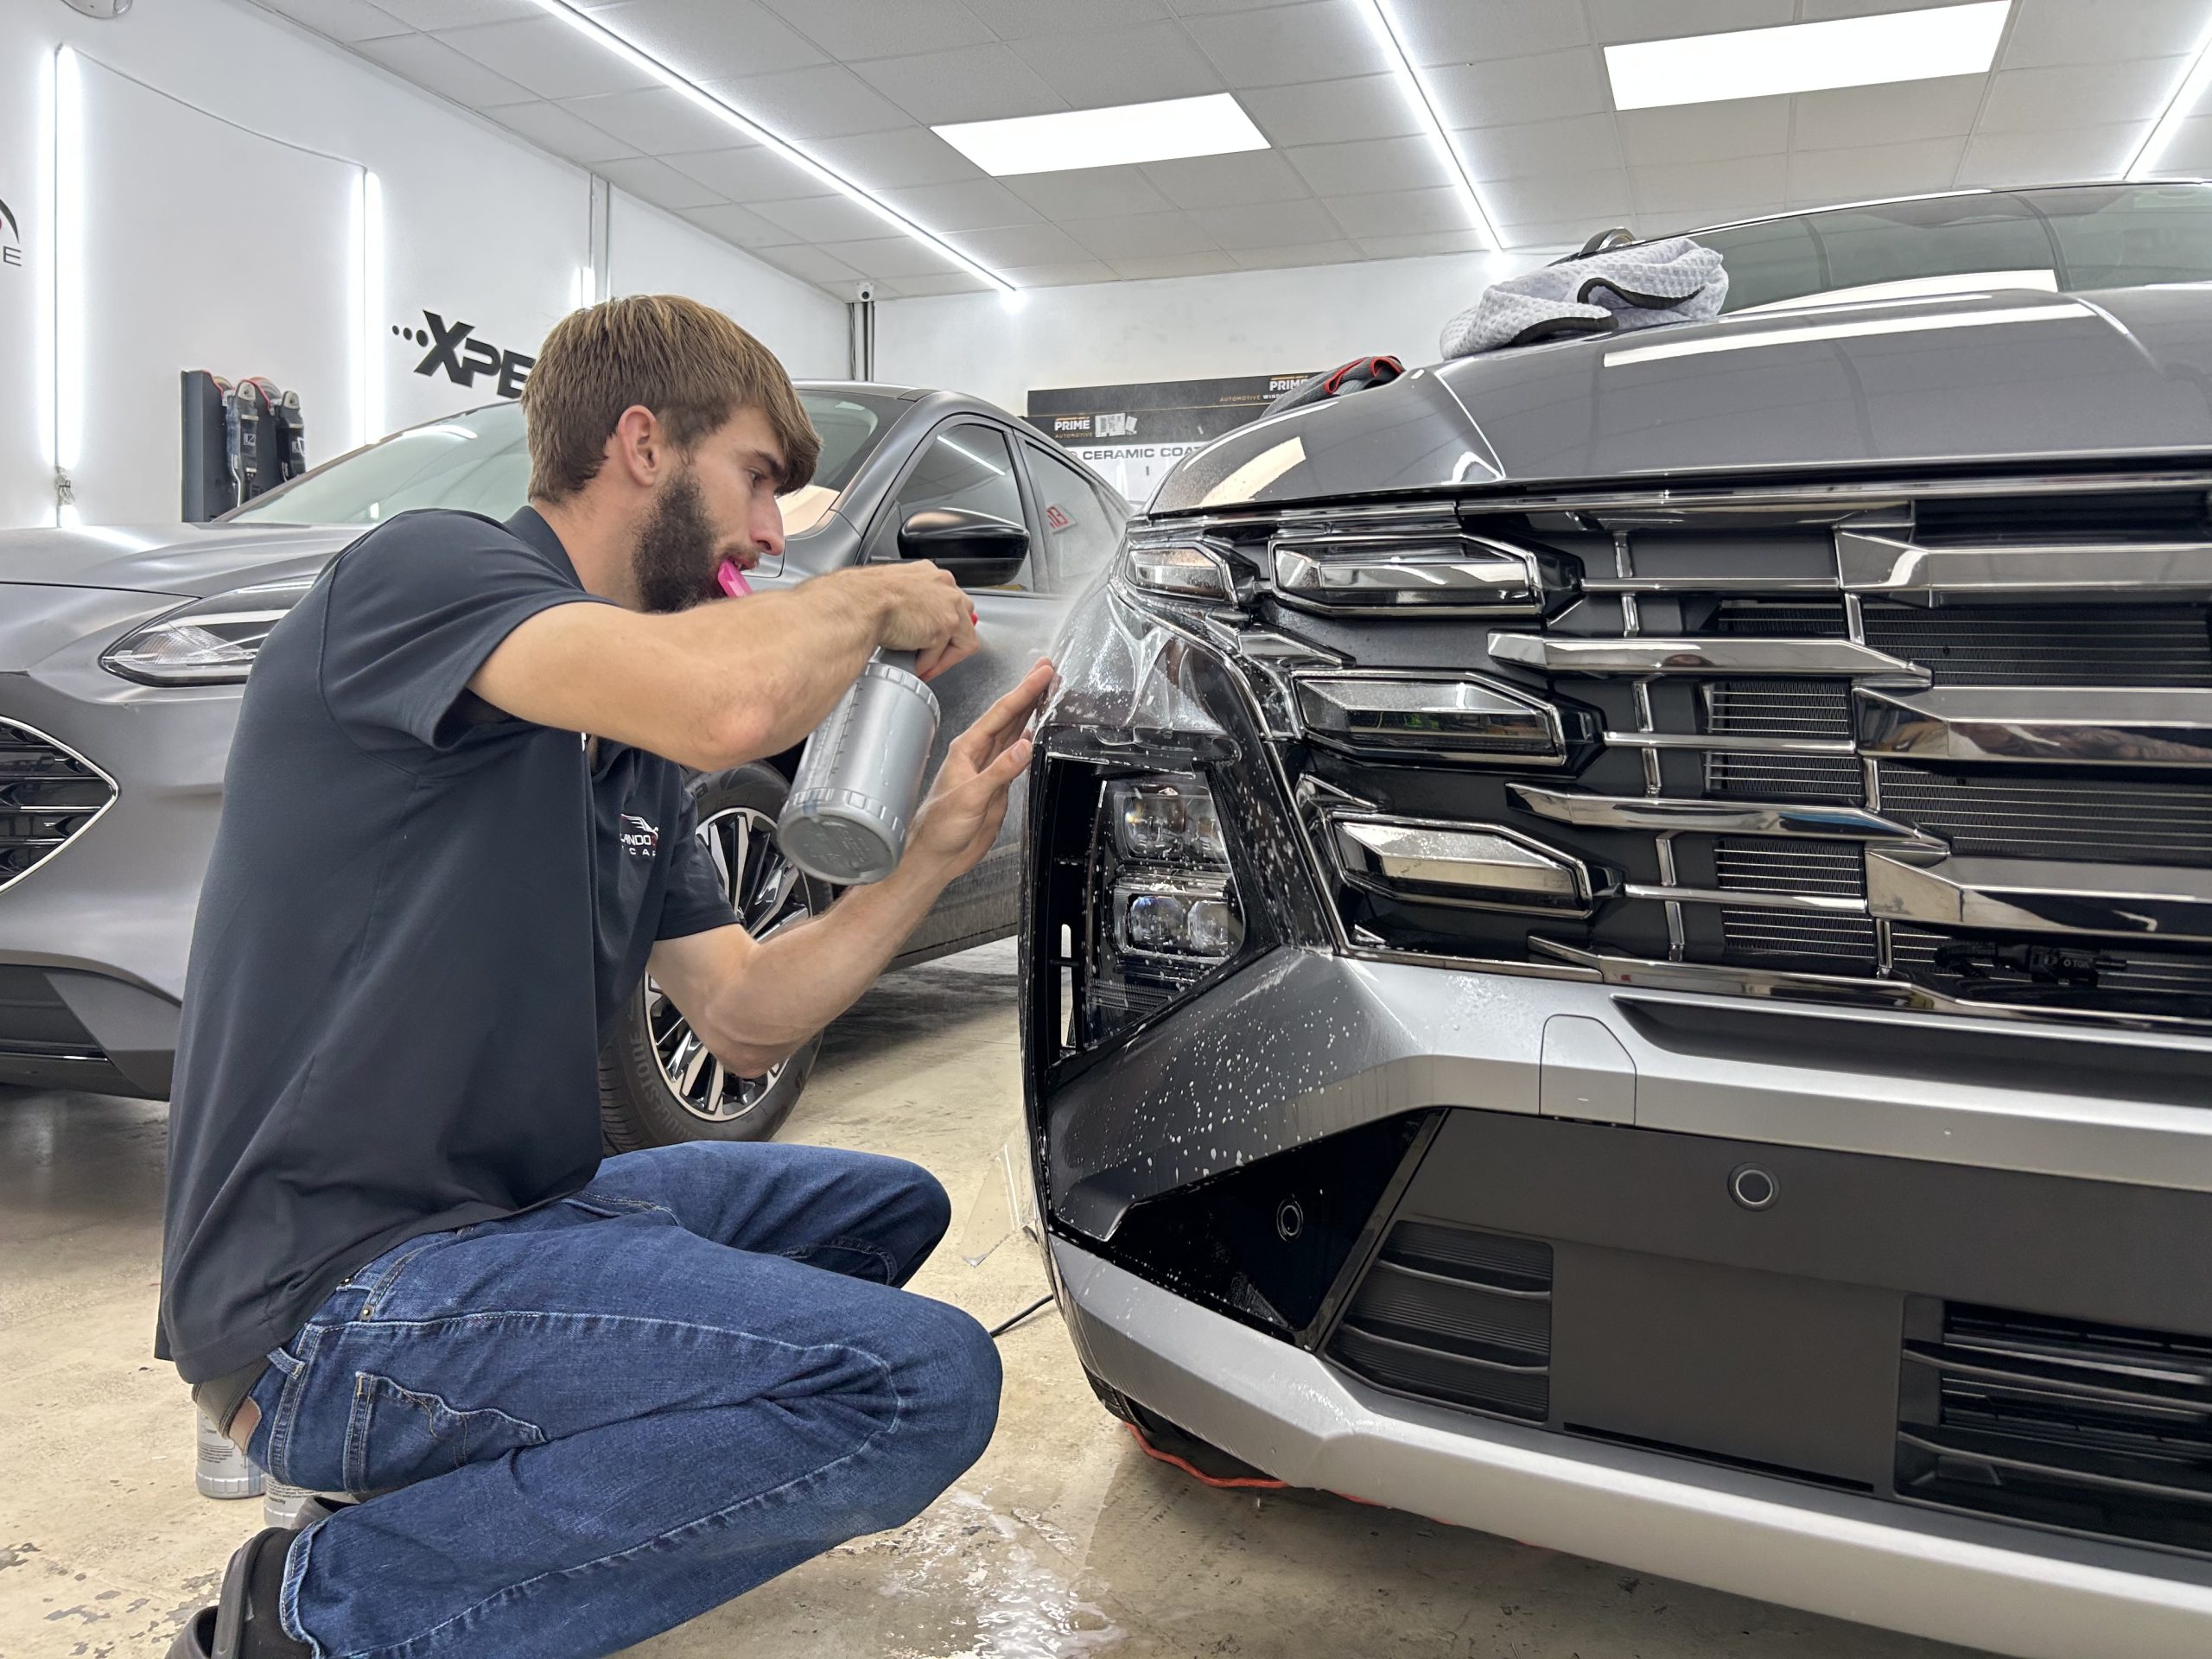
How Hugo\'s Auto Detailing pairs correction with protection
When a client asks for Exterior detailing with paint correction, we first define scope. Are we chasing a one step enhancement with a polish, or a multi step correction to remove the bulk of swirls and etching? At Hugo's Auto Detailing we find that a one step with a fine abrasive and a firm foam pad often restores 60 to 80 percent of clarity on daily driven vehicles without risking thin areas on edges. Finishing polish residue gets a careful panel wipe, then we install a polymer sealant as the base layer. On darker paints where the owner wants that extra warmth, we return at the next wash and apply https://keegandpny382.theglensecret.com/how-marine-gel-coating-restores-and-protects-your-boat-s-finish a carnauba topper. The sealant carries the durability, the wax adds character without long term commitment.
On newer cars with only light marring, we may do a decon, clay, and a mild one step, followed by a mid grade ceramic coating. The result is a bright, easy to wash surface that shrugs off bug splatter and road film. We tell owners to wash with a pH neutral soap, and to avoid dealer washes with harsh detergents. A light silica spray every month keeps hydrophobics high without altering the underlying coating.
The chemistry behind bond and why it can fail
Three problems show up repeatedly when protection does not stick.
First, residual oils and fillers from compounds mask the true finish. If you do not remove them, a sealant may shear off in the first few washes. You can watch this happen as water stops beading and starts sheeting unevenly.
Second, incompatible products fight each other. Some old school acrylic sealants will not allow a modern hybrid topper to lay flat. You get streaking and a grabby surface. Reading technical sheets and doing a test panel saves time.
Third, climate and cure windows matter. A ceramic coating that needs 10 to 15 minutes to flash at 70 degrees might flash in 3 minutes at 90 degrees. Waiting too long can create high spots that require repolishing. Working indoors, measuring panel temperatures, and adjusting wipe times are not fancy extras. They are the difference between a runway shine and a patchy mess.
A quick pairing guide for real life conditions
- Daily driver, parked outside, light to moderate swirls corrected: polymer sealant base, optional wax topper after a week if you prefer depth over pure gloss. Weekend show car, kept garaged: fine polish correction, high content carnauba or hybrid wax, reapplied monthly for that hand rubbed sheen. High mileage commuter that sees winter salts: multi step correction on the worst panels, mid to high grade ceramic coating for chemical resistance, maintenance topper every 4 to 6 weeks. Work truck, white or silver paint, owner wants low effort: one step enhancement, durable sealant, reapply every 4 months. New vehicle delivery with minimal defects: decon and primer polish, thin single layer ceramic coating to lock in easy washing from the start.
Marine detailing and why gelcoat changes the rules
In Marine detailing, gelcoat is both tougher and thirstier than automotive clear. Oxidation sets in from the waterline up, especially on colored hulls where UV bakes the surface. Restoring chalky gelcoat requires an initial compounding step that physically removes dead material. The pad choice tends to be wool or aggressive microfiber, and the machines run slower to manage heat on curved hull sections.
After compounding, refining with a fine polish removes haze and restores clarity. If you stop here and apply an ordinary automotive wax, the shine might look great for a few outings, then drop off quickly. Gelcoat benefits from protection that can seal porosity. A quality marine sealant or a dedicated Boat ceramic coating with a solvent carrier that wets the surface properly will hold up through washdowns, bird droppings, and mooring grime. Around the waterline, where scum lines accumulate, the chemical resistance of a coating can save hours of scrubbing.
A note on Marine gel coating as a phrase often used in casual conversation. Many boat owners say gel coating when they mean reapplying protection or doing a heavy polish. True gelcoating is a refinishing process where you spray or roll fresh gelcoat. Most of the time, you do not need that. You need thorough oxidation removal, refining, and a protection product designed for the marine environment.
Marine lessons from Hugo's Auto Detailing
Our boat detailing service sees two patterns. The first is a relatively new hull with light oxidation. We do a single heavy polishing pass with a dedicated marine compound, then a refining pass. For protection, we choose a marine grade sealant that lays a tight film and cures fast. It will bead hard for a season if the owner rinses with fresh water after each trip and avoids harsh scum removers on the topsides. The second pattern is severe oxidation. Here, after cutting and refining, we install a Boat ceramic coating with a base and a topper layer the same day, watching humidity and temperature closely. The result is a harder, glassy look with better stain resistance at the waterline.
One 24 foot bay boat came in chalky blue. We tested three compounds on a one square foot section. The winning combination cut quickly without excessive heat, and it finished with a moderate haze that our second step cleared. After a panel wipe suited for gelcoat, we applied a marine coating in small sections, allowing two to three minutes before leveling. At the owner’s six month check, the hull still beaded evenly, and scum lines wiped with minimal effort. That is the outcome of pairing correction with the right protection, not just stopping at a glossy shop delivery.
How much correction do you really need
Most people overestimate how much cutting is required to achieve a satisfying result. The human eye is forgiving once you remove the systematic, uniform defects like wash swirls. Random deeper scratches become honest wear that does not broadcast itself. On thin edges, A pillars, and repainted bumpers, full correction becomes a risk to longevity. A one or two step enhancement paired with durable protection beats a hero cut that steals clear coat life.
At Hugo's Auto Detailing we track paint readings with a gauge during any substantial paint correction. If a fender reads under 90 microns total, we dial back. Clients appreciate honesty when you explain that preserving clear thickness is a type of protection too. A ceramic coating on a sensitively corrected panel pays dividends by reducing the mechanical abrasion of each wash.
Matching looks to colors and body lines
Protection products show themselves differently on different paints and shapes. On black or deep blue, carnauba lays a softer glow that makes rounded panels look liquid. A polymer sealant sharpens metallic flake, great on silver and light gray. A high solids coating emphasizes crisp reflections and panel edges, stunning on modern designs with hard creases.
Body lines matter as well. On a curvy classic with single stage paint, you tread lightly and test. Some single stage reds and blacks are thirsty and can stain pads quickly, leaving residue that needs extra passes. A hand applied wax can be the right call if machine heat risks marring. On modern clear, machine finishing followed by a ceramic coating brings out that showroom snap.
Wash process before and after protection
Decontamination and wash quality determine how well the protection bonds, and how long it lasts. Before correction, use an iron remover to break down embedded ferrous particles, then clay with plenty of lubricant to avoid adding fresh marring. After correction, panel wipe carefully without flooding edges or delicate repainted areas.
Once protected, washing technique becomes the long term caretaker. Use a pH neutral shampoo, proper mitts, and separate rinse buckets if possible. Avoid rotating brush tunnels that slap grit into the surface. If you have to use a touchless wash in winter, expect that the detergents will strip wax toppers and weaken some sealants. Coatings fare better, but they still appreciate gentle chemistry.
A minimalist maintenance checklist that actually works
- Wash every 1 to 2 weeks with a pH balanced soap and soft mitt. Dry with a clean, plush towel, or better, a small blower to push water from crevices. Apply a silica or polymer spray every 4 to 8 weeks to refresh slickness. Decontaminate with iron remover every 6 months if you live near railways or industrial zones. Inspect under bright light seasonally, spot polish minor defects, then reseal the treated area.
When to choose simplicity over layers
Stacking products can be satisfying, but there is a point where you gain little and risk smearing or hazing. Two clean layers of a compatible sealant, allowed to cure, protect better than one rushed coat topped with a wax the same afternoon. With coatings, more is not always better. A single quality layer, installed meticulously and kept clean, outperforms two mediocre layers with missed edges and high spots.
For garage kept vehicles that see fair weather, a refined polish and a thoughtful wax schedule deliver stunning looks with minimal fuss. For daily drivers that endure bird bombs and winter salts, jump to a coating and reduce stress. For boats that live in marinas, pick a protection designed to deal with salt, UV, and scum chemistry, and reapply on a predictable cycle.
Interior detailing and how protection outside affects inside
Interior detailing might feel separate, but there is a link. A protected exterior, especially with a slick coating, sheds dust and grime more easily, which means less dirt gets carried in each time you handle doors and trunk lids. Door jambs that are sealed or coated wipe down faster. On boats, non skid and vinyl live their own life, but a clean, sealed topside reduces the grit that migrates into cabins and lockers. A well considered Exterior detailing plan reduces the time you spend chasing crumbs and dust inside.
The risks and how to avoid them
Two avoidable mistakes dominate unhappy outcomes. The first is correcting, then immediately hiding micro marring with a heavy glaze, and sealing over it. It looks incredible for a week, then washes off, and the client wonders where the magic went. If you use a glaze, do it knowingly for a time boxed event and explain the trade off. The second is choosing a product because the label promises miracles. Paint, weather, and maintenance habits vary. A simple sealant that you reapply twice a year might outperform a boutique product that you install poorly.
On boats, beware aggressive cleaners after you apply a coating or sealant. Some acid based scum removers will etch a fresh layer if you hit it too early. Test a section or choose a neutral cleaner and accept a few extra minutes of dwell time.
Real world examples of smart pairing
A client brought a black sedan that lived under a flowering tree. The hood had etching from sap and bird droppings. We cut only where necessary, refined the finish, and installed a mid grade ceramic. Bird droppings in summer can etch a wax in hours. With a coating, the owner had more time to remove them without a permanent mark. Three months later, a gentle wash restored the same gloss, and the hydrophobics still shot water off the hood at 20 miles per hour.
Another case was a silver SUV that did road trips every weekend. Polishing silver for drama is a thankless task. We leaned into clarity, not glow. A careful one step, then a polymer sealant, created that crisp metallic pop. The owner liked to wax on Sunday mornings, so we suggested a non staining carnauba as a topper when he felt like it. The combination worked because it fit the use pattern and the color.
On the marine side, a white cabin cruiser came in with heavy oxidation on the cabin top and light chalking on the hull sides. We compounded and refined the cabin, then sealed it to simplify non skid cleanup. The hull got a Boat ceramic coating below the rub rail since the owner kept it in brackish water from May to September. Six months later at haul out, scale around the waterline brushed off with a soft pad and a mild cleaner, not the usual elbow grease and harsh chemicals.
Where a professional shines
The value of a skilled car detailing service is less about secret products and more about judgment. Knowing when to stop cutting, which pads finish best on a particular clear, how to time flashes on a humid day, and which protection chemistry pairs well with that finish, is what turns process into results. Shops that work across both automotive and marine surfaces bring cross training that helps on the margins. The way a gelcoat drinks in a solvent carrier informs how you handle porous, repainted bumpers. The way a ceramic amplifies panel lines on a hull teaches restraint on black cars with curvy fenders.
Hugo's Auto Detailing has learned to ask about storage, wash routines, and expectations before choosing a path. A carefully corrected surface protected by a coherent, compatible product is easier to live with, looks better longer, and costs less time in upkeep than a mismatched stack put together without a plan.
Final thoughts that help you decide
If you want warmth and are willing to touch the finish monthly, a wax over a mild correction can be deeply satisfying. If you want set and forget with strong chemical resilience, correct carefully and install a ceramic coating, then keep it clean. If you want a middle ground that suits family life and outdoor parking, a solid sealant after a one step correction is the intelligent compromise. For boats, remember that gelcoat wants a protection chemistry designed for it, and that salt, sun, and scum are unforgiving if you choose the wrong topper.
The pairing of paint correction with protection is less about chasing a trend and more about choosing a system. Do the preparation right, match the chemistry to the surface and environment, and your vehicle or vessel will hold a gloss that survives both bright sun and close inspection. That is the quiet reward for doing the work thoughtfully, whether it is a compact sedan that sees the school run, or a fishing rig tied up at the dock waiting for the next trip.

Hugo’s Auto Detailing
1610 East Valley Rd, Montecito, CA 93108
(805) 895-1623
FAQs About Car Detailing
How long does car detailing take?
Car detailing typically takes between 2 and 8 hours, depending on the vehicle’s size, condition, and whether services like paint correction or ceramic coating are included.
How often should I get my car detailed?
Most vehicles should be detailed every 3 to 6 months, especially in Montecito, CA where sun exposure and coastal conditions can impact your vehicle’s paint and interior.
Is paint correction required before ceramic coating?
Paint correction is recommended if your vehicle has swirl marks, scratches, or oxidation. Proper preparation ensures better bonding and long-term performance of the ceramic coating.