Integrate Photos: How To Combine Photos Together?
You're trying to be imaginative as well as attempting to combine pictures, yet not certain where to begin. Fret not, because in this tutorial, we'll show you exactly how to combine your photos with each other.
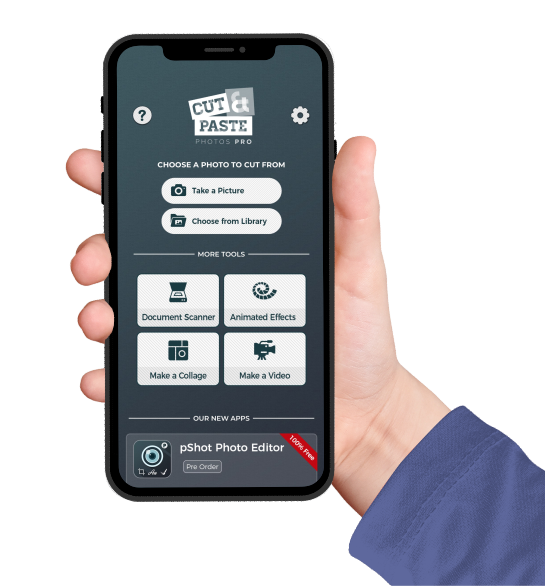
Exactly how do you integrate images using the Cut Paste Photos Pro App? Under MORE DEVICES, tap on the "Make a Collection" button to start merging photos with each other. You can pick 2-10 photos to combine, pick a format as well as also include message or filters to it!
What is the step-by-step procedure on how to do it? Allow us show you.
Combine Photos with Cut Paste Photos Pro App
Combine images promptly and easily with our Cut Paste Photos Pro Application "Collage Manufacturer." Merge your most extreme and most remarkable pictures in one. View your memories and share them with your enjoyed ones with just one click.
Step 1: Select 2-10 pictures.
Tap "Make Collection" under the EVEN MORE DEVICE corner on Cut Paste Photos Editor. Select two to 10 images from your Camera Roll to add to your collage. Faucet on NEXT.
Step 2: Choose your layout.
Once you have actually chosen the pictures you intend to merge, select your favored layout from the options under your canvas. Reposition your pictures up until you're satisfied with the final format. Afterwards, choose the boundary device.
Pick your format.
Step 3: Adjust the boundaries.
There are three ways to edit the border of your collage:
Move the slider to the right to produce a larger room between the images.
Change the frame or primary boundary dimension with the second slider.
Modify the corners of your images utilizing the last slider.
You can smooth out the edges to a curve by moving the slider to the right. When you're performed with the boundaries, faucet NEXT.
Tip 4: Pick a canvas size.
In this step, you can change the size or picture proportion of your collection. Pick from our preset social media dimensions, the initial picture size, or any one of the available options. As soon as you've picked your canvas size, faucet on NEXT to additional edit the collage.
Step 5: Modify as you incorporate pictures.
With our photo editor, you can also individualize your collection the way you want it. You can use the following devices:
Stickers, personalize texts and also scribbles
Splash color and image resize by pixel
Filter and impacts
Modification alternative and also tone contour
Flip, turn, plant, and also blur
As soon as you're happy with your end product, tap on Done.
Step 6: Save and share your picture collage.
Let the whole globe appreciate your spectacular collage. You can wait on your phone or share it today on your social networks.
Image Formatting Troubles and How to Deal with Them
It's true that an image paints a thousand words, yet it can also cost you a great deal of bucks if you don't utilize the ideal format. Here are some photo formatting errors and how to repair them.
Issue 1: You posted images without optimizing them and now your site is sluggish.
Solution: Maximize your image to medium.
The dimension of your image dimension has a big impact on your website's performance more than you assumed. Simply to make it clear, we're discussing documents dimension in megabytes (MB), kilobytes (kb), and so on-- not the actual dimensions of the photo (such as 800 x 600 pixels).
If your data sizes are too big, your site will start to reduce as the web pages take a longer time to lots. That indicated shedding site visitors that don't have the patience to wait.
On the various other hand, if your image size is as well tiny, you jeopardize the aesthetic top quality of your photos. So look for the balance in between the real dimension as well as the quality or resolution of the photo to determine its general documents size.
Issue 2: The prime focus of your image is not recognizable.
Option: Plant wisely.
Cropping your photos is an essential step in the formatting procedure, especially for photos. Naturally, you're not cropping out the vital parts, however you must remove some parts to boost the focus or state of mind of the picture.
On the other hand, beware not to plant in so close that it distorts your picture. But if you have to do it, make sure to begin with a relatively high-resolution picture.
Trouble 3: Your mixed photo is constructed badly.
Service: Mount your picture to develop maximum impact.
Just like chopping, you should do mounting when taking a photo or creating an image. It has a great deal to do with the standard policies of make-up as follows:
attain equilibrium as well as focus with the "Rule of Thirds"
organize things in teams of three
highlight elements such as lines as well as patterns to create repeating
benefit from favorable and also adverse space
include leading lines to direct the visitor's focus to the focal point
Mount your picture to develop maximum effect.
Trouble 4: The consolidated picture you uploaded looks distorted.
Solution: Scale proportionally.
One reason that images look misshaped on sites is that they've been extended of percentage to fill a particular room. To prevent this, keep the initial proportions of the picture when readjusting it up or down, instead of extending the length or size to fit.
There are platforms that automatically scale your uploaded images to fit their own requirements. If you're uploading images to those platforms various other than your very own, be certain to examine out the advised upload dimension as well as format for your image.
Trouble 5: You conserved your combined image in the wrong data style.
Service: Find out the distinctions between data types.
Not all documents styles are created equivalent. Each documents format has its details usages, with its very own set of benefits and drawbacks. Below's a quick review below of these data types:
JPG (or JPEG): Pro-- Used primarily for pictures or highly detailed/colorful images and also graphics; Con-Not appropriate for images with message
PNG: Pros-- Understood to have high image top quality and also great color depiction; supports transparency/opacity; creates sharp lines as well as sides
GIF: Pro-- This is the only file kind that sustains animation; excellent for easy graphics; Con-- shade capacity is not like JPGs
SVG: Pros-- resolution and also zoom independent, significance, it will certainly stay sharp as well as vivid no matter what device you view it on, just how high-resolution the display is, or how much you focus.
PDF: Pros- preserves the initial web content and also look of a data regardless of where or just how it is viewed; ideal for presenting whole files online like a pamphlet/guide/manual, e-book, etc.
. Problem 6: You got supply images for your site, yet likewise see those photos everywhere.
Service: If possible, stay clear of stock pictures, or search for the special ones.
Stock images can be a best option if you do not have the time or sources to create your very own pictures. On the drawback, when you utilize a supply picture, there's an opportunity that you will certainly see the exact same picture on a rival's internet site. There are great deals of saying as well as worn-out supply photos available, so do an extra initiative to discover the one-of-a-kind ones.
One sure solution to prevent this trouble is to not use stock photos at all. You can produce your own initial pictures rather, if that's your specific niche. If you can not do that, at least miss the first web page of search results to locate something one-of-a-kind and also matches your brand name or objective.
If possible, stay clear of stock pictures, or look for the distinct ones.
Problem 7: You want to edit your image, but you're scared that you might exaggerate it.
Option: Maintain the layouts fundamental and also attempt not to go wild with unique impacts.
Not everybody is good with image editing. Some create great image modifies while others develop poor outcomes. If you're working with a picture, attempt to boost it little by little. You can readjust the contrast or illumination of your image, improve its saturation, or sharpen it up a little. Simply ensure that it would certainly still look attracting the eyes after all of your edits.
Problem 8: The colors of your photo never look fairly precisely your computer system screen.
Remedy: Attempt checking your display.
It's crucial that the colors presented by your display are exact if you're working with digital images. While choosing which shades or edits to utilize, you require to see the photos you're modifying as they show up online. If https://cutpastephotospro.com/app-features your display is acting up and showing shades inaccurately, you won't have the ability to do that.
Preferably, calibrate your screen as well as see to it to set the illumination between 90 as well as 120 cd/m2. Although this adjustment could limit the contrast of your screen, it's most likely to be extra presentable to your target market no matter which monitors they are watching from.
Create And Also Send Out A Computer Animated Image To Your Loved Ones
Are you planning to send a computer animated image to your unique somebody? How can sappy could it be if you produced that photo yourself?
Just how do you create and also send out a computer animated picture? On the Cut Paste