[Mac][iOS]minizip ファイルの圧縮と解凍(その2)
前回の続き。得られたZipファイル内のパスからファイルのデータを取り出す。
        unzLocateFile(file, filename, 0);
        unzOpenCurrentFile(file);
        NSMutableData   *data = [NSMutableData data];
        void            *buffer = (void *)malloc(BUFSIZ);
        int             len;
        while ((len = unzReadCurrentFile(file, buffer, BUFSIZ)) != 0) {
            [data appendBytes:buffer length:len];
        }
        free(buffer);
        printf("----------\n");
        for (NSUInteger i = 0U; i < [data length]; i++) {
            printf("%c", ((char *)[data bytes])[i]);
        }
        printf("\n----------\n");
        unzCloseCurrentFile(file);
ソースコード
GitHubからどうぞ。
https://github.com/murakami/workbook/tree/master/mac/Zip
関連情報
zlib
A Massively Spiffy Yet Delicately Unobtrusive Compression Library
Minizip
Zip and UnZIp additionnal library
ZipArchive
An Objective C class for zip/unzip on iPhone and Mac OSX
objective-zip
An iOS wrapper for ZLib and MiniZip
Objective-CでZIPアーカイブを読み取る
@marvelphさんのブログです。
関東第51回Cocoa勉強会のご案内
[Mac][iOS]minizip ファイルの圧縮と解凍
前回のZipArchiveライブラリが内部で利用していたminizipライブラリを直接利用する事に挑戦する。
minizipを直接利用する利点は、複数のファイルが固められて圧縮されていた場合、全てを解凍するのではなくて、必要なファイルのみにアクセスする事が可能になる事だ。
以下のMinizipのサイトからminizipライブラリ一式をダウンロードする。
Minizip
minizip一式には、コマンドラインのプログラム用のソースファイルが含まれているので、ライブラリとして使用する場合に必要となる、以下のファイルのみをプロジェクトに追加する。
crypt.h
ioapi.c
ioapi.h
mztools.c
mztools.h
unzip.c
unzip.h
zip.c
zip.h
プロジェクトに以下のライブラリを追加する。
libz.dylib
文書オープンのダイアログで指定したzipファイルの中身を出力するコードを追加する。
@interface AppDelegate : NSObject
        :
- (IBAction)openDocument:(id)sender;
@end
#import "unzip.h"
        :
@interface AppDelegate ()
- (void)unzip:(NSString *)path;
@end

@implementation AppDelegate
        :
- (IBAction)openDocument:(id)sender
{
    DBGMSG(@"%s", __func__);
    NSOpenPanel *panel = [NSOpenPanel openPanel];
    [panel beginSheetModalForWindow:self.window
                  completionHandler:^(NSInteger returnCode){
        NSURL       *pathToFile = nil;
        NSString    *path = nil;

        if (returnCode == NSOKButton) {
            pathToFile = [[panel URLs] objectAtIndex:0];
            path = [pathToFile path];
            DBGMSG(@"%@", pathToFile);
            DBGMSG(@"%@", path);
            dispatch_async(dispatch_get_main_queue(), ^{
                [self unzip:path];
            });
        }
    }];
}

- (void)unzip:(NSString *)path
{
    DBGMSG(@"%s, %@", __func__, path);
    int error = UNZ_OK;
    unzFile file = NULL;
    file = unzOpen([path UTF8String]);
    unzGoToFirstFile(file);
    while (error == UNZ_OK) {
        unz_file_info   fileInfo;
        char            filename[PATH_MAX];
        unzGetCurrentFileInfo(file, &fileInfo, filename, PATH_MAX, NULL, 0, NULL, 0);
        DBGMSG(@"%s", filename);
        error = unzGoToNextFile(file);
    }
    unzClose(file);
}
@end
以下のディレクトリ構造のフォルダをzipで圧縮する。
junk
 | file01.txt
 | file02.txt
 +- folder01
 |    file11.txt
 |    file12.txt
 +- folder02
      file21.txt
      file22.txt
これを先ほどのコードでディレクトリ構造をデバッグ出力した結果の抜粋が以下。
junk/
junk/file01.txt
junk/file02.txt
junk/folder01/
junk/folder01/file11.txt
junk/folder01/file12.txt
junk/folder02/
junk/folder02/file21.txt
junk/folder02/file22.txt
ソースコード
GitHubからどうぞ。
https://github.com/murakami/workbook/tree/master/mac/Zip
関連情報
zlib
A Massively Spiffy Yet Delicately Unobtrusive Compression Library
Minizip
Zip and UnZIp additionnal library
ZipArchive
An Objective C class for zip/unzip on iPhone and Mac OSX
objective-zip
An iOS wrapper for ZLib and MiniZip
Objective-CでZIPアーカイブを読み取る
@marvelphさんのブログです。
[Mac][iOS]ZipArchive ファイルの圧縮と解凍
iOSはストレージ容量もメモリも節約を求められる。また、データサイズが小さくなる事によって、操作性の向上も期待できる。
その為にキーとなる事の一つにデータの圧縮と解凍があるが、今回は、Cocoaでzipデータを扱う初歩的に事に挑戦する。
業務上パスワード付きzip圧縮ファイルを受け取る事が多いのだが、何時もこれを解凍するのをコマンドラインでおこなっていた。
$ unzip -P パスワード ファイル.zipこれをAppStore時代では存在が小さくなってしまったが、Dropletsとして実装してみよう。
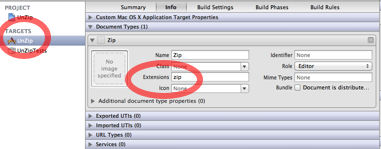
Mac OS XのCocoa Applicationを新規作成し、TARGETSの設定のDocument TypesにZip文書を追加する。
アプリケーションのデリゲートに、以下のコードを追加する。
- (BOOL)application:(NSApplication *)theApplication openFile:(NSString *)filename
{
    DBGMSG(@"%s, filename(%@)", __func__, filename);
    return NO;
}
これでドラッグ&ドロップされた一つのファイルのパスが取得できるようになった。
次に、ZipArchiveライブラリを以下のサイトから入手する。
http://code.google.com/p/ziparchive/
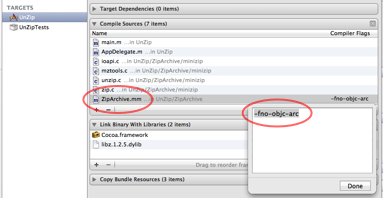
入手したZipArchiveライブラリをプロジェクトに組み込み、ZipArchive.hでUIKit.hをインクルードしているのでコメントアウトし、

ZipArchive.mmをARCの対象から外す。
そして、かなり手抜きをしているが、zipファイルが渡されると、末尾の"zip"サフィクスを削るコードを先ほどのメソッドに追加する。
#import "ZipArchive.h"
        :
- (BOOL)application:(NSApplication *)theApplication openFile:(NSString *)filename
{
    ZipArchive  *archiver = [[ZipArchive alloc] init];
    [archiver UnzipOpenFile:filename];
    NSString    *path = [filename stringByDeletingPathExtension];
    [archiver UnzipFileTo:path overWrite:NO];
    [archiver UnzipCloseFile];
    return YES;
}
        :
ソースコード
GitHubからどうぞ。
https://github.com/murakami/workbook/tree/master/mac/UnZip
関連情報
ZipArchive
An Objective C class for zip/unzip on iPhone and Mac OSX
[iOS][Web]ネイティブWebアプリケーション(その2)
DocumentsディレクトリやLibraryディレクトリ配下への配置を考えたが、課題があるということで、バンドル・リソース内に配置する方法を試してみた。
実際にWebアプリケーションを組み込む状況を想定して、前回、用意してHTMLコンテンツが置かれているwebappフォルダ配下に、infoとaboutフォルダを追加して、このディレクトリ構造が保たれたまま、アクセスできる事を確認したいと思う。

infoとaboutフォルダをXcodeのプロジェクトにドラッグ&ドロップする。すると、以下のシートが表示されるが、Distinationのチェックは外し、Foldersは2番目の"Create folder references for any added folders"を選択する。

するとプロジェクトでの表示は、以下となる。

"webapp/index.html"の内容は以下のとおり。
<html>
    <head>
        <title>My WebApp</title>
    </head>
    <body>
        <p>My WebApp</p>
        <a href="info/index.html">info</a><br />
        <a href="about/index.html">about</a>
    </body>
</html>
"webapp/info/index.html"の内容は以下のとおり。
<html>
    <head>
        <title>Info</title>
    </head>
    <body>
        <p>Info</p>
    </body>
</html>
"webapp/about/index.html"の内容は以下のとおり。
<html>
    <head>
        <title>About</title>
    </head>
    <body>
        <p>About</p>
    </body>
</html>
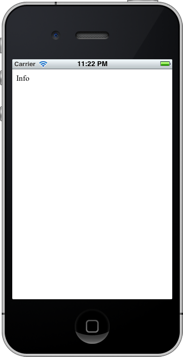
実行。infoとaboutのリンクが機能するので、バンドル・リソース内でもディレクトリ構造は保持されている事が分かる。

GitHubからどうぞ。
https://github.com/murakami/workbook/tree/master/ios/WebApp - GitHub
関連情報
File System Programming Guide
iOS標準ディレクトリのファイル保存場所が説明されている。
[iOS][Web]ネイティブWebアプリケーション
WWDCで、最初のiPhoneの開発環境の紹介があった際は、Webアプリケーションのみを認めるという説明だったが不要だった為、その後、ネイティブ・アプリケーションが開発できるSDKがリリースされた。
とは云うものの、Webアプリケーションでも対応できる分野はあると思われるし、WebアプリケーションとネイティブAPIを組み合わせる手法も出来ているので、今回は、ネイティブなWebアプリケーションの初歩の初歩に挑戦してみた。
Single View Applicationのプロジェクトを新規生成する。

ViewをUIWebViewに置換する。

HTMLコンテンツを置くフォルダをグループとして登録し、"index.html"を新規ファイルとして生成する。

ViewControllerに、アプリケーション内部のHTMLコンテンツを表示するコードを追加する。
- (void)viewDidLoad
{
    [super viewDidLoad];

    UIWebView   *webView = (UIWebView *)self.view;
    NSString    *path = [[NSBundle mainBundle] pathForResource:@"index" ofType:@"html"];
    NSURL   *fileURL = [[NSURL alloc] initFileURLWithPath:path];
    NSURLRequest    *req = [NSURLRequest requestWithURL:fileURL];
    [webView loadRequest:req];
}
実行。

まだ、これは初歩の初歩で、HTMLコンテンツの置き場所はバンドル・リソースでいいのか?とか、ディレクトリ構造を保持したまま、実行時の環境にコピーするには?とか課題があるが、それは次回で。
ソースコード
GitHubからどうぞ。
https://github.com/murakami/workbook/tree/master/ios/WebApp - GitHub
関連情報
User Experience Coding How-To's
Apple Developerサイトの情報。
iPhone Webアプリケーション
Webアプリケーションの見本として参考になる。
[Mac]談話と特殊効果(Text-to-Speech)
WWDCに行くと、どんな方向を目指しているのか感じ取る事が出来る。また、その場で理解できなくても、これは聞いた事があるな?と、調査のヒントを得られる。今回は、WWDCが解決の糸口になった例だ。
OS Xでテキストの内容をスピーチされる事は簡単だ。
Cocoaでは、
NSSpeechSynthesizer *synthesizer = [[NSSpeechSynthesizer alloc] init];
[synthesizer setDelegate:self];
[synthesizer startSpeakingString:@"Hello, world."];

- (void)speehSynthesizer:(NSSpeechSynthesizer *)sender
    didFinishSpeaking:(BOOL)finishedpeaking
{
    ...
}
Core Foundationでは、
SpeechChannel *chan;
err = NewSpeechChannel(NULL, &chan);
CFNumber *callback = CFNumberCreate(NULL, kCFNumberLongType, HighlightSpokenWord);
err = SetSpeechProperty(chan, kSpeechWordCFCallBack, callback);
err = SpeakCFString(chan, CFSTR("Hello, world."), NULL);

void HighlightSpokenWord(SpeechChannel chan,
    SRefCo refCon,
    CFStringRef aString,
    CFRange wordRange)
{
    ....
}
でも、それにAudio Unitを使った効果を適用させるには、どうすればいいのか?
どうして、これが出来ると思ったのかは今となっては思い出せないが、多分、WWDCでのセッションの内容が頭の片隅にあったのだろう。それで、WWDCのセッションのビデオを見直しのが、WWDC2009のSession 129『Text-to-Speech: Adventures with Alex』だった。
一度、解決の糸口をつかむと、後は芋づる式。ヘッダーファイルのコメントで説明されていた。
SpeechSynthesis.h

/*------------------------------------------*/
/* AudioUnit constants - new in 10.5        */
/*------------------------------------------*/
enum {
  kAudioUnitSubType_SpeechSynthesis = 'ttsp', /* kAudioUnitType_Generator */
  kAudioUnitProperty_Voice      = 3330, /* Get/Set (VoiceSpec)      */
  kAudioUnitProperty_SpeechChannel = 3331 /* Get (SpeechChannel)      */
};
指定した文章をSpeech Synthesisで喋らせ、それをAudio Unitのコンポーネントでディレイさせて再生させる例が以下だ。
AUNode

NewAUGraph(&_auGraph);

AudioComponentDescription
cd.componentType = kAudioUnitType_Generator;
cd.componentSubType = kAudioUnitSubType_SpeechSynthesis;
cd.componentManufacturer = kAudioUnitManufacturer_Apple;
cd.componentFlags = 0;
cd.componentFlagsMask = 0;

AUGraphAddNode(_auGraph, &cd, &inputNode);

cd.componentType = kAudioUnitType_Effect;
cd.componentSubType = kAudioUnitSubType_Delay;
AUGraphAddNode(_auGraph, &cd, &effectNode);

cd.componentType = kAudioUnitType_Output;
cd.componentSubType = kAudioUnitSubType_DefaultOutput;
AUGraphAddNode(_auGraph, &cd, &outputNode);

AUGraphConnectNodeInput(_auGraph, inputNode, 0, effectNode, 0);
AUGraphConnectNodeInput(_auGraph, effectNode, 0, outputNode, 0);

AUGraphOpen(_auGraph);
AUGraphInitialize(_auGraph);

AudioUnit
AUGraphNodeInfo(_auGraph, inputNode, NULL, &generateAudioUnit);
SpeechChannel
UInt32
AudioUnitGetProperty(generateAudioUnit, kAudioUnitProperty_SpeechChannel,


AUGraphStart(_auGraph);

SpeakCFString(channel, CFSTR("Hello, world."), NULL);
ソースコード
GitHubからどうぞ。
https://github.com/murakami/workbook/tree/master/mac/TextToSpeech - GitHub
関連情報
Speech
Speech Synthesis Programmig Guide
Using the Japanese Analysis Engine and Access Method
WWDCノススメ
この時期になってくると気になるのは、今年のWWDCについてだ。
今年は、どうしましょう。行くべきでしょうね。
Cocoa勉強会でも、WWDCについての情報を発信しています。
WWDCノススメ 2008
WWDCノススメ 2009
WWDCノススメ 2010
[iOS]Image Masking(その3)
前回のクリッピングではCoreGraphicsの関数を使ったが、今回はUIKitのUIBezierPathを使ったクリップングに挑戦だ。
前回のCoreGraphicsの関数を使ったコードだ。
- (void)drawRect:(CGRect)rect
{
    CGContextRef    context = UIGraphicsGetCurrentContext();
    CGSize  imageSize = self.image.size;
    CGRect  imageRect = {10.0, 10.0, imageSize.width, imageSize.height};
    float   radius = 10.0;
    CGFloat minX = CGRectGetMinX(imageRect);
    CGFloat midX = CGRectGetMidX(imageRect);
    CGFloat maxX = CGRectGetMaxX(imageRect);
    CGFloat minY = CGRectGetMinY(imageRect);
    CGFloat midY = CGRectGetMidY(imageRect);
    CGFloat maxY = CGRectGetMaxY(imageRect);

    /* 現状の描画環境を保存 */
    CGContextSaveGState(context);

    /* 四角形の辺に接する、半径radiusの円弧を四隅に追加 */
    CGContextMoveToPoint(context, minX, midY);
    CGContextAddArcToPoint(context, minX, minY, midX, minY, radius);
    CGContextAddArcToPoint(context, maxX, minY, maxX, midY, radius);
    CGContextAddArcToPoint(context, maxX, maxY, midX, maxY, radius);
    CGContextAddArcToPoint(context, minX, maxY, minX, midY, radius);
    CGContextClosePath(context);

    /* 先ほどのパスをクリップ領域として設定 */
    CGContextClip(context);

    /* 描画 */
    [self.image drawAtPoint:CGPointMake(10.0, 10.0)];

    /* 描画環境を先ほどの保存時点に戻す */
    CGContextRestoreGState(context);
}
UIBezierPathを使うとこうなる。ちょっと、四隅が丸い四角の例なので、簡単なコードになってしまったが。
- (void)drawRect:(CGRect)rect
{
    CGContextRef    context = UIGraphicsGetCurrentContext();
    CGSize  imageSize = self.image.size;
    CGRect  imageRect = {10.0, 10.0, imageSize.width, imageSize.height};
    float   radius = 10.0;

    /* 現状の描画環境を保存 */
    CGContextSaveGState(context);

    /* 四角形の四隅を半径radiusの円弧に */
    UIBezierPath*   aPath = [UIBezierPath bezierPathWithRoundedRect:imageRect cornerRadius:radius];

    /* パスをクリップ領域として設定 */
    [aPath addClip];

    /* 描画 */
    [self.image drawAtPoint:CGPointMake(10.0, 10.0)];

    /* 描画環境を先ほどの保存時点に戻す */
    CGContextRestoreGState(context);
}
ソースコード
GitHubからどうぞ。
https://github.com/murakami/workbook/tree/master/ios/ImageMasking - GitHub
関連情報
Programming with Quartz: 2D and PDF Graphics in Mac OS X
CoreGraphicsを解説した書籍。
Drawing and Printing Guide for iOS
iOS Developer Libraryの情報。
[iOS]座標と描画(その4)
前回の例で、ビットマップ・コンテキストを利用していたが、Retina displayとなった現在では、以下の方法がお勧めだ。
前回では、CoreGraphicsの関数を使ってビットマップ・コンテキストを生成して、そこに描画していた。
- (void)drawRect:(CGRect)rect
{
    CGContextRef    context = UIGraphicsGetCurrentContext();

    /* LLO(lower-left-origin) */
    size_t  witdh = rect.size.width;
    size_t  height = rect.size.height;
    size_t  bytesPerRow = witdh * 4;
    bytesPerRow = COMPUTE_BEST_BYTES_PER_ROW(bytesPerRow);
    unsigned char   *rasterData = calloc(1, bytesPerRow * height);
    CGColorSpaceRef colorSpace = CGColorSpaceCreateDeviceRGB();
    CGContextRef    bitmapContext = CGBitmapContextCreate(rasterData, witdh, height,
                                                8, bytesPerRow,
                                                colorSpace,
                                                kCGImageAlphaPremultipliedLast);

    CGContextSetRGBStrokeColor(bitmapContext, 1.0, 0.0, 0.0, 1.0);
    CGContextSetLineWidth(bitmapContext, 4.0);
    CGContextBeginPath(bitmapContext);
    CGContextMoveToPoint(bitmapContext, 5.0, 25.0);
    CGContextAddLineToPoint(bitmapContext, 5.0, 5.0);
    CGContextDrawPath(bitmapContext, kCGPathStroke);
    CGContextMoveToPoint(bitmapContext, 5.0, 5.0);
    CGContextAddLineToPoint(bitmapContext, 25.0, 5.0);
    CGContextDrawPath(bitmapContext, kCGPathStroke);


    CGImageRef  cgimage = CGBitmapContextCreateImage(bitmapContext);
    CGContextDrawImage(context, rect, cgimage);
    CGContextRelease(bitmapContext);
    free(rasterData);
    CGColorSpaceRelease(colorSpace);
}
iOS4からは、以下のように記述できる。
- (void)drawRect:(CGRect)rect
{
    CGContextRef    context = UIGraphicsGetCurrentContext();

    /* ULO(upper-left-origin) */
    UIGraphicsBeginImageContextWithOptions(rect.size, NO, 0.0);
    CGContextRef    bitmapContext = UIGraphicsGetCurrentContext();

    CGContextSetRGBStrokeColor(bitmapContext, 1.0, 0.0, 0.0, 1.0);
    CGContextSetLineWidth(bitmapContext, 4.0);
    CGContextBeginPath(bitmapContext);
    CGContextMoveToPoint(bitmapContext, 5.0, 25.0);
    CGContextAddLineToPoint(bitmapContext, 5.0, 5.0);
    CGContextDrawPath(bitmapContext, kCGPathStroke);
    CGContextMoveToPoint(bitmapContext, 5.0, 5.0);
    CGContextAddLineToPoint(bitmapContext, 25.0, 5.0);
    CGContextDrawPath(bitmapContext, kCGPathStroke);

    UIImage*    uiimage = UIGraphicsGetImageFromCurrentImageContext();
    UIGraphicsEndImageContext();
    [uiimage drawAtPoint:CGPointMake(0.0, 0.0)];
}
この方法だと、- (void)drawRect:(CGRect)rectメソッドの描画環境と座標系が同じとなる。
ソースコード
GitHubからどうぞ。
https://github.com/murakami/workbook/tree/master/ios/Coordinate - GitHub
関連情報
Programming with Quartz: 2D and PDF Graphics in Mac OS X
Drawing and Printing Guide for iOS
Apple Developerの情報です。